I’ve never made bread without using my breadmaker, and I’ve never made cinnamon rolls at all. However! Faint heart never won fair dessert, so I thought I’d give it a try today.

This recipe is from Betty Crocker Baking Basics – recipes and tips to bake with confidence, which is available on Amazon.com and Amazon.ca. This is definitely a recipe you need to read through a few times before attempting.

Time required: 4 hours
Yields: 15 rolls
Total cost if you have none of the ingredients: $38.
Cost per roll: $2.54
Kitchen implements I used:
- KitchenAid mixer
- small sauce pan
- candy thermometer
- 9″ x 13″ pan
- rolling pin
Dough ingredients:
- 3½ C to 4C of all-purpose white flour (divided)
- ⅓ C granulated white sugar
- 1 TSP salt
- 4½ TSP fast-acting yeast
- 1 C milk
- ¼ C unsalted butter, softened
- 1 egg
- cooking spray
Filling ingredients:
- ½ C granulated white sugar
- 2 TSP ground cinnamon
- ¼ C unsalted butter, softened
Glaze ingredients:
- 1 C icing sugar
- 1 TBSP butter, softened
- ½ TSP vanilla
- 1 to 2 TSP milk
Dough instructions:
1. Make the dough in the bowl for your mixer, combine: 2 C flour, sugar, salt, and yeast. (Measure out another 2 C of flour and set it aside.) Blend ingredients well with wooden spoon. It took not quite two of those little packets to get enough yeast.


2. Heat milk in a sauce pan on medium until temperature reads between 49°C and 54°C (120°F to 130°F).

3. Add warm milk, egg, and butter to dry ingredients.

4. Beat on low for 1 min, stopping to stir down sides 3 times. Everything should be moistened now.

Beat on medium for 1 min, scrape sides 2 times.
5. Now add the reserved flour, half a cup at a time, and gently beat it in with the wooden spoon. (This was about the time I remembered my KitchenAid has a bread hook, but oh well.)

According to the book, you just stir in the flour as you add it, but my dough was not absorbing the extra flour, the lump of dough kept moving around the bowl but none of the flour got sucked in. Bread dough is kind of weird, I’ve never seen it before. It’s… almost gunky at first, then it gets ropey. Hard to describe.
Anyway I stuck it back in the mixer for a minute and beat the hell out of it. Suggest you uh… find your own path to making bread. Don’t follow my path which is fraught with peril. From the bowl of flour I reserved from the original measuring, I used all but about ½ C.
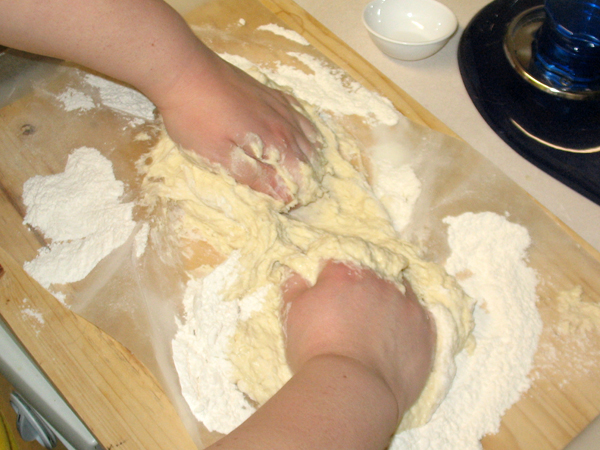
6. Knead the dough on a floured surface for 5 minutes.. (What does that even mean?) I decided to put wax paper on a collapsing table, thunk the dough down, and punch the shit out of it. Why? Because I have a teeny tiny amount of counter space and it’s currently all covered in stuff I was too lazy to remove prior to starting this endeavor. In hindsight this may have not been the best idea, but the timer dinged and my 5 minutes were up. Thank God.

7. Spray a bowl with cooking spray, plop the dough in the bowl, and turn it so it gets covered in the cooking spray (I’m not clear why you do this, but that’s what the book said to do).
Cover the bowl with plastic wrap (whether to cover loosely, or tightly, is a bone of contention). Leave the bowl alone for 1.5 hours in a draft-free area. I grabbed Voltron to show scale.

8. Behold! The mighty process of fermentation. (That’s what the yeast does to make the bread rise, adding the water re-activates the yeast to produce carbon dioxide, which rises.)

Unwrap the dough and press one finger into it. If the indentation remains in the dough it’s ready. I got so excited about punching the dough I forgot to do this step.
My dough hath risen, am feeling confident, half the battle is won.
Onto the filling!
Filling instructions:
9. Spray the 9″ x 13″ pan with cooking spray.
10. In a small bowl combine white sugar and cinnamon. Set aside.

11. Punch the dough to deflate the gas. (Apparently you aren’t supposed to go Chuck Norris on it, just one or two love taps is enough? Boring!)

12. Flour the counter top or wherever you intend to flatten the dough, and use your hands to spread it out.

13. Roll it into a 10″ x 15″ rectangle.

14. Spread the softened butter over surface, and sprinkle with cinnamon sugar mix.


15. Starting with the long side, roll the dough up like a jelly roll.

Try to get an evenly shaped roll of dough. Best of luck with that part.

16. Use a serrated knife to cut into 15 pieces. Or 13, or whatever.

17. Place the pieces into the greased pan.
Cover with plastic wrap again, and leave for 30 min to rise again.

Now it’s time to bake those bad boys.
Baking the rolls:
Pre-heat oven to 176°C / 350°F, and use centre rack.
Take the plastic wrap off the tray of rolls, and bake them for 30 minutes.
18. Remove rolls from the pan immediately and transfer to wire rack. Let cool 5 minutes.


Now all that’s left is to make the glaze and you are done. Finally!
Glaze instructions:
19. Combine icing sugar, butter, vanilla, and milk. Stir until smooth and drizzle over warm rolls.

Sit back and enjoy the results of what feels like an entire day’s work.
Verdict: God, this took forever. I think they are a little bit over done, but Boyfriend thinks they are perfect. I’d take 5 minutes off the baking time when I make them again. They tasted great.
Playlist: Song of the Hero – The Legend of Zelda, Symphony of the Goddesses