Dessert at Tony’s Bistro & Pâtisserie

Finally! I have been to Tony’s Bistro & Pâtisserie, and it’s totally worth a flight to Moncton. My sister has been raving about it for months. After sampling the goods I completely understand. Let this sink in for a minute.

20140723_185316

Tony’s is located at 137 McLaughlin Drive, Moncton, NB, E1A 4P4. It opened in 2013 and the owner/chef is Tony Holden, who has cooked for Queen Elizabeth II and Emperor Akihito. He has almost 30 years of experience and trained under French pastry chefs. Tony’s is a licensed bistro, with a varied menu, and a pastry display cabinet that will halt you in your tracks.

20140723_184746

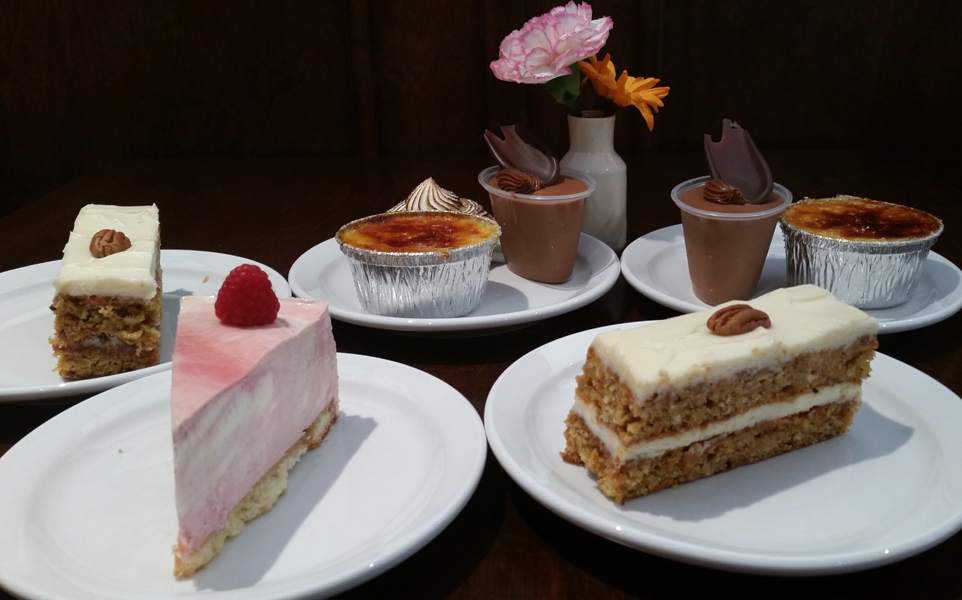
We had just eaten dinner with my family, so we ordered dessert; carrot cake, raspberry cheesecake, crème brûlée, chocolate mousse, lemon tart, and coffee. Yes I know. Totally sinful. It all looked so good and I couldn’t decide on just one thing.

20140723_185230

What was it like? Firstly, the presentation was gorgeous. Someone takes pride in their work.

20140723_185412

And everything was delicious. The mousse (paradise in a cup) was so creamy!  The meringue is covering the lemon tart, which was exquisite. And the crème brûlée was impressive!

20140723_190014

How do they get the sugar to glass like that? When I make it, my sugar topping does not look like that! It was like stained glass and you could hear the snap when you broke it with the spoon. I was intrigued to see a tray of the custards in the display fridge, as every recipe I’ve read for this dessert says don’t caramelize the sugar ahead of time or it will sink into the custard. Clearly there is a way to make this work! I must learn this.

20140723_185323

The carrot cake and the cheesecake were both excellent as well. Oh, yum, so glad we went!

Review:

From the street, you really cannot tell what’s inside. I grew up 30 minutes from Moncton and Tony’s is not located in a neighbourhood that screams “delicious high-end food here”. The decor inside was pretty and spacious and bright. It’s a nice shock to find a place like Tony’s in that part of Moncton.

We visited around 6:30pm on a Wednesday. The server was pleasant and efficient.

I was pleasantly surprised to see the variety and quantity of desserts in the pastry cabinet. Some restaurants are pretty bare at that time of day, so it was really nice to see such a gorgeous display, and to get to try whatever I wanted.

The food was sublime, and reasonably priced.

I’ve decided on two new personal goals for myself. The first is that I shall visit Tony’s more often when I am in the area, just once was not enough! The second is that I shall become a person of international acclaim so perhaps Tony will cook for me. God, can you imagine?

Advertisement

Washington Pie

20140719_191909

I made Washington Pie for my mother’s birthday, which is a frosted yellow cake with a jam filling (shares traits with Boston cream pie). My Nanny used to make it and it’s been a long time since we’ve had it. I figured nostalgia would gloss over any technical errors on my part. This was served partially raw and uh, note the ratio of frosting to cake in the centre is not same on the outside edge? More on that later.

20140719_131130

This recipe comes the red and white Better Homes & Gardens cookbook, but I’m not sure which edition, ours doesn’t have it but Mom’s did.

Working in a different kitchen is always weird. I got to use the Onyx Black KitchenAid, which is just as reliable as my precious Nemo (if not quite as beautiful). I’m not used to this oven and that may have contributed to one of the problems with this cake.

Time required: 2 hours

Yields: 12 slices

Total cost if you have none of the ingredients: $45

Cost per slice: $3.75

Kitchen implements I used:

  • KitchenAid mixer
  • two 9″ round pans

Ingredients:

  • 2 egg whites
  • ½ C white sugar
  • 2¼ C cake flour
  • 1 C white sugar
  • 3 tsp baking powder
  • 1 tsp salt
  • ⅓ C vegetable oil
  • 1 C milk
  • 1½ tsp vanilla
  • 2 egg yolks
  • 5 TBSP pure strawberry or raspberry jam

Instructions:

1. Pre-heat oven to 176°C / 350°F. Grease and flour two 9″ rounds.

2. Separate the eggs, put the whites into the mixing bowl and put the yolks into a small bowl for later.

20140719_132449

Beat the whites until soft peaks form (when you remove the beater they’ll sink down).

20140719_134235

3. Gradually add ½ C sugar, beating until very stiff peaks form (you remove the beater and see little mountains of foam that stay upright).

20140719_134457


4. Combine dry ingredients in a separate bowl. Having a second mixing bowl saves you a lot of time.

20140719_134552

5. Add: vegetable oil, vanilla, and half the milk to the dry ingredients. Beat 1 min on Medium, scrap sides 3 times. (If I had a DeLorean, I’d have used the bowl with higher sides, since this led to a face full of wet cake and that is as vile as it sounds.)

20140719_135000

6. Add remaining milk and yolks. Beat 1 min, scrape sides 3 times.

20140719_135433

I always enjoy watching one of these in action. I realize they all do exactly the same thing but I will just happily observe for awhile.

20140719_135858

7. Unless you made a colossal error you should have two bowls like so:

20140719_140213

Gently fold the egg white mixture into 2nd bowl, turn the bowl and use a down, up, over motion

20140719_140455

You don’t want to stir it like crazy.

20140719_140523

You want it to look like this.

20140719_140731

8. Divide batter into pans, bake 25 min.

20140719_140955

9. Ask Spousal Unit to remove the cake from the oven and test. Believe that toothpick test was successful. Cool in pan 10 min before removing from pan and transferring to wire rack. Well damn. That’s not supposed to happen.

“Did you test the middle?”

“Yup, it came out clean.”

“Why is the middle raw then?”

“I don’t know.”

20140719_152451

Throw back in for another 5 min and pray.

10. Cool one hour.

11. Speed to birthday party. Position one cake so that the rounded side is facing down and you have a flat surface. That was the plan anyway. This cake has no true flat surface.

20140719_170536

12. Place a few tablespoons of jam in a glass bowl and microwave 40 seconds, spread warm jam over the flat cake surface.

13. Place the second cake on top (again round side down) so you have a flat surface to frost. What the hell went wrong here??

14. Cram frost with vanilla buttercream. I didn’t get a picture of the completed cake but the frosting hid the majority of the gaps. This picture is not the most appetizing but it was good. The centre of the cake was… not ideal, but the outer edge was bang on. See how much frosting is in the centre as opposed to the edge? Oh well. Good thing I love buttercream frosting.

20140719_191909

Verdict:

Never trust someone else to take your cake out of the oven. That’s what I learned from this experience. At least Mom was happy and that’s what counts. Next time I’ll try lining the pans with parchment paper.

Playlist:

Buckethead – White Wash

Mascarpone round 2 (Eureka!)

After the disappointing results of Saturday I pondered for awhile and came home from work to try again. Behold! A puff pastry stuffed with fresh mascarpone and drizzled with hot fudge sauce.

20140707_090922

Mascarpone. That hideously over-priced Italian dessert cheese used in real tiramisu. Difficult to find in the grocery store. Case in point, I checked 5 stores and when I finally found it:

20140704_195330

Shocking!

Lately I’ve been uninspired in the kitchen. I was talking dessert ideas with my sister and asked if she had ever eaten something with mascarpone? Her response was to lapse into silence for a moment, before rapturously describing the best dessert she had ever eaten. I figure that anything which evokes that response is something I must learn how to cook with. I wasn’t sure what I even wanted to make with it, just the possibility of working with it got me thinking. Lo and behold, making it only takes 2 ingredients; heavy cream 36% and a lemon. Ah hah!

20140705_121203

Recipe source: I’m not sure where this idea originated, I found it on Pastry Affair, and searched around, everybody seems to use the same method; heat the cream and lemon juice, strain and chill and voila (hopefully). It looks the same on Mother Would Know. I found some very good pictures of the process on Savory Bites.

Time required: 1 hour of work + 8 hours to set

Yields: uh, maybe about 2 cups?

Total cost if you have none of the ingredients: under $5 if cream is on sale

Kitchen implements I used:

  • heavy-bottom sauce pot
  • candy thermometer
  • strainer
  • cheese cloth
  • plastic wrap

Ingredients:

  • 2 C heavy cream, aim for 36% milk fat, avoid ultra pasteurized
  • 1 TBSP freshly squeezed lemon juice

Instructions:

1. Heat the cream to 88°C / 190°F. Stir often. Note for next time, skip the heat diffuser.

20140705_123323

2. Stir in the lemon juice, and heat mixture for 5 min, trying to keep temperature constant.

UPDATED JULY 26: after 3rd try at this, have determined 5 minutes it just not enough, I think other people might have a gas stove with consistent heat? It took about 25 min on a coil-top stove for rounds 2 and 3 

20140706_214135

Disclosure: it’s supposed to take 5 minutes. It took me 20. The temperature kept dropping. I was using a heat diffuser which I discarded. The cream should curdle and thicken a bit. I found this part strangely difficult.

3. Cool to room temperature, either 20 min in a cold water bath or 45 min on the counter should do it.

20140705_125142

4. Dampen cheese cloth lightly with water and line strainer, 4 layers of cloth. Put bowl under strainer.

5. Plop the mixture into the centre of the cloth. Don’t push it down. Cover with plastic wrap and chill at least 8 hours.

20140706_223902

This looks much different from the first attempt where nearly half the “cheese” ran through the cloth within one second. You don’t believe that, do you? Here, preserved for posterity.

20140705_132433

If yours looks like that ^, go back to the drawing board.

Meanwhile, go make some pastry or something.

20140705_205938

6. In the morning, cross your fingers and invert mass into container.

20140707_085638

Peel off cloth. Ah hah!

20140707_085708

Look at it, holding it’s shape and everything!

7. Stir well.

20140707_085851

8. Spread into pastry and garnish. I made some hot fudge sauce the other night and figured why not.

20140707_090044

Enjoy what you have wrought!

20140707_090504

Verdict: Definitely good. Making it at home is much more sensible than buying a wee-sized container. If I had some fresh fruit I’d put that in a pastry but I’m out of fruit at the moment. You really need to make sure the cream thickens, something so simple was surprisingly easy to ruin. I declare making this yourself to be worth the effort.

Playlist: Halo – Mjolnir mix

Homemade mascarpone

Apparently making mascarpone is really easy. I was all excited to do it. You may have clinked on this link hoping to see how to make mascarpone. You would be mistaken.

20140706_092028

“Some magician. You couldn’t turn cream into cheese!”

I let it sit overnight in the fridge but the centre is still liquid, I cooked it for the right time but lowered the temperature to avoid burning it and I think that was the problem, it’s supposed to cook at 190°F for the entire time. It wasn’t a total failure, you can see where part of it held it’s shape, will try again after work tonight.

Sing along in your best GLaDOS voice.

This was no triumph.
I’m making a note here;
HUGE SCREW-UP
It’s hard to understate my aggravation