Vanilla rhubarb ice cream

20160824_115535

Yesterday Maui and I made ice cream together! I was so excited to make ice cream again. I found out she hadn’t seen Labyrinth (imagine) so we watched that while we waited for the ice cream to finish.

Before you get started: These instructions are written for using a Kitchen Aid ice cream maker. You need to freeze the bowl at least 24 hours in advance, and make the base of the ice cream the day before.

Yields: 16 servings of approx 120 mL (½ cup) per serving

Ingredients:

  • 590 mL Half and Half (2½ cups)
  • 8 egg yolks
  • 200 g granulated white sugar (1 cup)
  • 590 mL Heavy Cream 35% (2½ cups)
  • 1 vanilla bean, split and scrapped
  • 0.5 g salt (⅛ tsp)
  • 200 g chopped rhubarb (2 cups) + 25 g white sugar (2 tbsp)

Instructions:

1. In a sauce pan on Medium, heat the Half and Half until it’s steaming but not boiling. Stir often. Remove from heat and set aside.

2. In mixing bowl, whip the yolks and sugar until just combined.

3. Gradually add the heated mix to the sugar, (I used a strainer since a skim developed). Once all the hot mixture has been added and the mixture is combined, return it to the sauce pot.

4. Add the vanilla bean to the pot.

5. Cook on Medium until small bubbles form at the edge and mixture steams, don’t boil it.

6. Transfer to mixing bowl with a spout  (I strained it again), stir in whipping cream and salt. Using a bowl with a spout is the best thing you can do since you’ll be pouring this into a moving mixer later which you cannot stop as you pour.

7. Cover and chill overnight.

8. Half an hour before you’re ready to start the ice cream, turn the rhubarb into jam-like consistency. Put the chopped fruit and the sugar in a sauce pan, heat on Medium for a bit until it starts to break down, then keep on Low until it’s pulpy, stirring often. Once the fruit is broken down, set it aside.

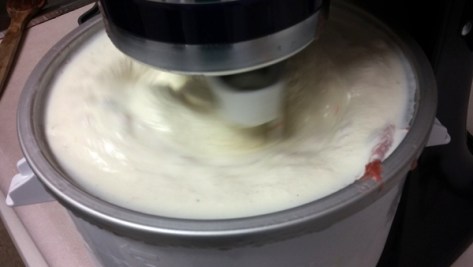
9. Time to churn ice cream! Put the drive assembly in place and set the dasher into the frozen bowl. Turn mixer on to Speed 1 BEFORE you add the cooled mixture. Churn at least 20 minutes until the machine makes a clicking noise.

20160823_163455

Churn it up!

10. Spoon the rhubarb into the ice cream and stir a bit more.

20160823_164824

20160823_164841

11. Store in air-tight container and freeze.

20160823_165624


Enjoy!

20160824_115535

Verdict:

Delicious!  I will add an extra cup of rhubarb next time, since I can’t see much pink in the ice cream. I can taste it but I was envisioning striations of fruit through the ice cream which didn’t really happen.

I will also churn the ice cream for longer, I found that the bottom of the bowl was still soupy and hadn’t firmed up.  That fixes itself once you freeze it, but to enjoy it right away I think you do need to churn it longer, or maybe risk stopping the bowl and using a spatula to scrape it up from the bottom?  I don’t know. Last time I stopped the bowl while ice cream making everything immediately froze to the side of the bowl.

Pumpkin ice cream

The Starks are always right. Pumpkin-flavoured everything is coming.

Before you get started: Freeze your ice cream bowl for at least 15 hours.  After all the ingredients are combined, chill at least 1 hour before churning. This recipe is from the book that came with the attachment.

Time required: 3 hours (under 1 hour of actual work)

Yields: about 8 cups of ice cream

Total cost if you have none of the ingredients: $29.

Cost per scoop: maybe $1.80

Kitchen implements I used:

  • Nemo the KitchenAid mixer
  • ice cream maker attachment
  • mesh strainer

Ingredients:

  • 1½ C half and half (or light cream)
  • 6 egg yolks
  • ¾ C granulated white sugar
  • ½ TSP vanilla
  • ¾ TSP pumpkin pie spice
  • 1½ C heavy cream
  • 1½ C canned pumpkin

Instructions:

1. Scald the half and half in a heavy-bottomed sauce pot.

2. Combine yolks, sugar, and vanilla.

3. Use a strainer, and gradually temper in the hot half and half. Eww yuck skim.

4. Whisk in pumpkin pie spice.

5. Return mixture to stove, heat on medium-low for 10 min, stirring frequently. It’ll thicken. Don’t let it boil though.

6. Remove pot from heat.

7. Add canned pumpkin and heavy cream to mixing bowl. Strain in the hot mixture and whisk together.

Some desserts cannot be strained enough. I wholeheartedly endorse straining anything that involves scalded dairy.

Have no fear, it will all combine into this.

8. Chill at least one hour before churning into ice cream.

9. When you are ready to make ice cream, churn on speed 1 for 15-20 minutes until dasher clicks.

It stayed pretty fluid until about 15 minutes, that’s when I could see it was starting to firm up. Mine took 18 minutes before the first click.

I am pleased to report this time that I have figured out the frozen bowl completely, it stayed in place, and no thumbs were pinched.

10. Transfer to tupperware container and freeze at least 1 hour before serving.

11. Let thaw a few minutes before scooping with beautiful blue KitchenAid scoop!!

Verdict: Boyfriend says it tastes just like pumpkin pie, it was so good. I can’t really tell what it tastes like because I have a cold and my taste buds have died. :[

Making ice cream is so great! What shall I do with all of the frozen egg whites I have left over?

Playlist: Halo OST

Belgian chocolate peanut butter ice cream

It’s Thanksgiving. I have no pumpkin. But I have something better.

This was a three-person enterprise made by yours truly, Boyfriend, and our friend V. This recipe is from the book that came with my ice cream maker, and I used my favourite Callebaut Belgian chocolate instead of baking squares, and added peanut butter chips. It was even more of a production than the cookies ‘n cream if you can imagine!

Before you get started: Your ice cream bowl needs to be frozen for at least 15 hours.

Once your start churning the ice cream, never, ever stop the mixer.

Time required: 2 days (1.5 hours of actual work and overnight chilling)

Yields: about 8 cups of ice cream

Total cost if you have none of the ingredients: $41, depending on the quality of chocolate

Cost per scoop: maybe $2.50

Kitchen implements required:

  • Nemo the KitchenAid
  • ice cream attachment
  • strainer

Ingredients:

  • 2 C heavy cream, divided
  • 60 g semi-sweet chocolate (2 oz)
  • 60 g unsweetened chocolate (2 oz)
  • 2 C half and half
  • 1 C granulated white sugar
  • ⅓ C cocoa
  • 8 egg yolks
  • 4 TSP vanilla extract
  • ⅛ TSP salt
  • 184 g milk chocolate (6.2 oz)
  • 1 C peanut butter cup pieaces

Instructions:

1. Chop the chocolate with a serrated blade, weigh it out and set aside. (The milk chocolate needs to be kept seperate, but the semi-sweet and unsweetened can be put in the same bowl.)

2. Using a double boiler on low, heat ½ C of the heavy cream, with the semi-sweet and unsweetened chocolate. Stir often and once chocolate has melted smoothly, remove from heat.

3. In a different sauce pan on medium, heat the half and half to steaming. Remove from heat. (I convinced Boyfriend and V to do the stirring and pot watching because I HATE that part. Ah, helpers!)

4. In a small bowl combine sugar and cocoa. Set aside.

5. In mixer combine egg yolks and sugar/cocoa mix, beat til blended.


6. Gradually temper in the warm chocolate/cream mixture into the yolks. Strain the warm half and half into the yolks. Don’t skip straining, it catches a huge skim which you don’t want in your ice cream. Or maybe you do. Ew. Blend on low until mixture is thoroughly combined.

7. Return mixture to sauce pan, heat to scalding (small bubbles form under surface but don’t let it boil). It will thicken up a bit but don’t worry.

8. Remove from heat, and stir in the remaining 1½ C of heavy cream into the hot mixture. Cover and chill overnight.

9. The next day, place frozen bowl in mixer and start the mixer. Pour in chilled mixture, all at once, and beat on speed 1 for 10-15 minutes.

So yeah… what I said about don’t stop once you’ve started? The bowl was making a funny noise, and Boyfriend determined I put the bowl on backwards. The mixer was stopped for 30 seconds to re-position the bowl. Bad idea. By the time the mixer started back up, the ice cream had completely frozen to the bowl and he had to churn it by hand like crazy to get it going again, while I cursed and shouted in the background.

“It’s ruined. It’s going to be awful. Look, it’s not even moving!”

“It’s not ruined, it’s going to be fine!”

10. When 30 seconds remain, add milk chocolate, and peanut butter chips.

11. Transfer to tupperware container and freeze at least 2 hours.

12. Let stand 10 minutes before scooping.

Verdict: Wow, this is delicious. It reminds me a lot of Chocolate Supreme ice cream which I haven’t had in years. It’s very rich though. Three scoops was way too much.  Can’t wait til V gets to try it.

Playlist: Halo OST

Cookies ‘n cream ice cream

For reasons I have never been able to fathom, Boyfriend does not like ice cream. But that’s totally cool, because that means there is more for me. Behold! Homemade ice cream!!

How did I make ice cream, you ask? Well! My wonderful family sent me the KitchenAid ice cream maker for my birthday. It’s an attachment designed to fit any model of a KA mixer, and I have been lusting after it for months. I can’t believe it’s finally mine!!

Before you get started: Making ice cream can be a two-day process. The bowl used to churn the cream needs to be frozen for at least 15 hours, and the recipe may require that you chill the mixed ingredients over night. This particular recipe (from the book that comes with the attachment) is very similar to making custard. I used real vanilla bean instead of extract though.

There is a helpful video here which shows how to assemble and use the attachment. Changing the ingredients or the ratios can screw up your finished product.

Time required: 2 days (1.5 hour of actual work)

Yields: I don’t even know, it’s a lot.

Total cost if you have none of the ingredients: $20.

Cost per scoop: Can you price joy? I don’t think so.

Kitchen implements I used:

  • Nemo the KitchenAid mixer
  • ice cream maker attachment
  • strainer

Ingredients:

  • 2½ C half and half
  • half of one vanilla bean, split and scraped
  • 8 egg yolks
  • 1 C granulated white sugar
  • ⅛ TSP salt
  • 2½ C heavy cream
  • 10 Oreo cookies

Instructions:

1. In a heavy-bottomed sauce pan on medium heat, combine scraped vanilla bean and the half and half. Heat to steaming.

2. Combine egg yolks, sugar, and salt. Using speed 2 for 30 seconds is enough.

3. Pour hot mixture through strainer and temper into the eggs, and whisk on low to combine.

4. Return entire mixture to stove top, and heat to scalding.

When small bubbles form at the edge it’s ready. Oops. This has heated too much. I used a different sauce pot for the second time and the bottom is too thin. Ugh I knew changing pots was a bad idea but I couldn’t be bothered to wash and dry my best pot for this type of stuff. That’ll teach me.

5. Transfer mix to a metal bowl and place into cold water bath. This will cool the temperature to prevent it from cooking.

After I poured the mixture into the red bowl, I looked at bottom of the sauce pan. Uh oh. This is not good. Scorched eggy mixture. I hope my ice cream doesn’t taste like burnt eggs. That would be worse than having no ice cream at all. :/

Hopefully the strainer caught all the bad stuff. (Don’t force stuff through the strainer, that defeats the point of straining.)

(Instant water bath! Sink! Ice cubes! Water!)

6. Cover mixture and chill overnight.

7. The next day, chop up Oreos and set aside.

8. Fit the drive assembly over the pin on the head of the mixer. Take chilled ice cream bowl from freezer, assemble the lock on the base, and set it in the stand. Set the dasher inside the bowl and turn mixer on lowest speed. The head should grab the dasher and turn smoothly.

Now here is where I ran into problems. Try as I might, the bowl would not fit into the base. I wish I had tested this before freezing, but now I’m panicking that my bowl is thawing so I decide to go ahead, and I’ll just hold the bowl steady while it churns. (Not the best idea, a KA mixer churns like you wouldn’t believe even on low and I got my thumbs pinched.)

9. In one pour, add the entire chilled mix to the running mixer (if the mixer is stopped your ingredients will flash freeze to the side of the bowl).

10. Churn on lowest speed for 20 minutes. It will start rising up the sides, the middle looks the right texture but the edges are soft and liquidy, I tried to scrape down the rim a few times but at this point it becomes gloriously messy. I wasn’t worried because from everything I have read about making ice cream at home, it’s normal to get soft serve and you freeze it to harden further.

11. When you have 30 seconds left, add the Oreos. The KA recipe said to use one and half cups of chopped Oreos. That was too much, they flew out of the bowl and hit me in the face. I got Oreos and ice cream everywhere.

12. It’s done! The ice cream is soft serve at this state, so transfer to a tupperware container and freeze for a few hours.

13. When you’re ready to enjoy some, let it sit 5 minutes on the counter before scooping.

Verdict: Delicious!! I invited a friend over and we enjoyed this lovely ice cream on my patio.

I was afraid I ruined it last night when I overcooked it during the second heating phase, but it turned out wonderfully! I’m still unclear why the bowl didn’t fit into the bottom of the mixer. After I cleaned the dishes I tested this again, and the bowl sits in there correctly without the locking piece – so I’m confused. The base lock is specifically for use with the tilt-head Artisan which I have. Oh well. I still got ice cream! And it was wonderful! I will see if I can figure out how to get the bowl situated correctly next time… when I make BELGIAN CHOCOLATE PEANUT BUTTER! Gwahahahah!

Playlist: The Legend of Zelda – Symphony of the Goddesses concert