Sanctified

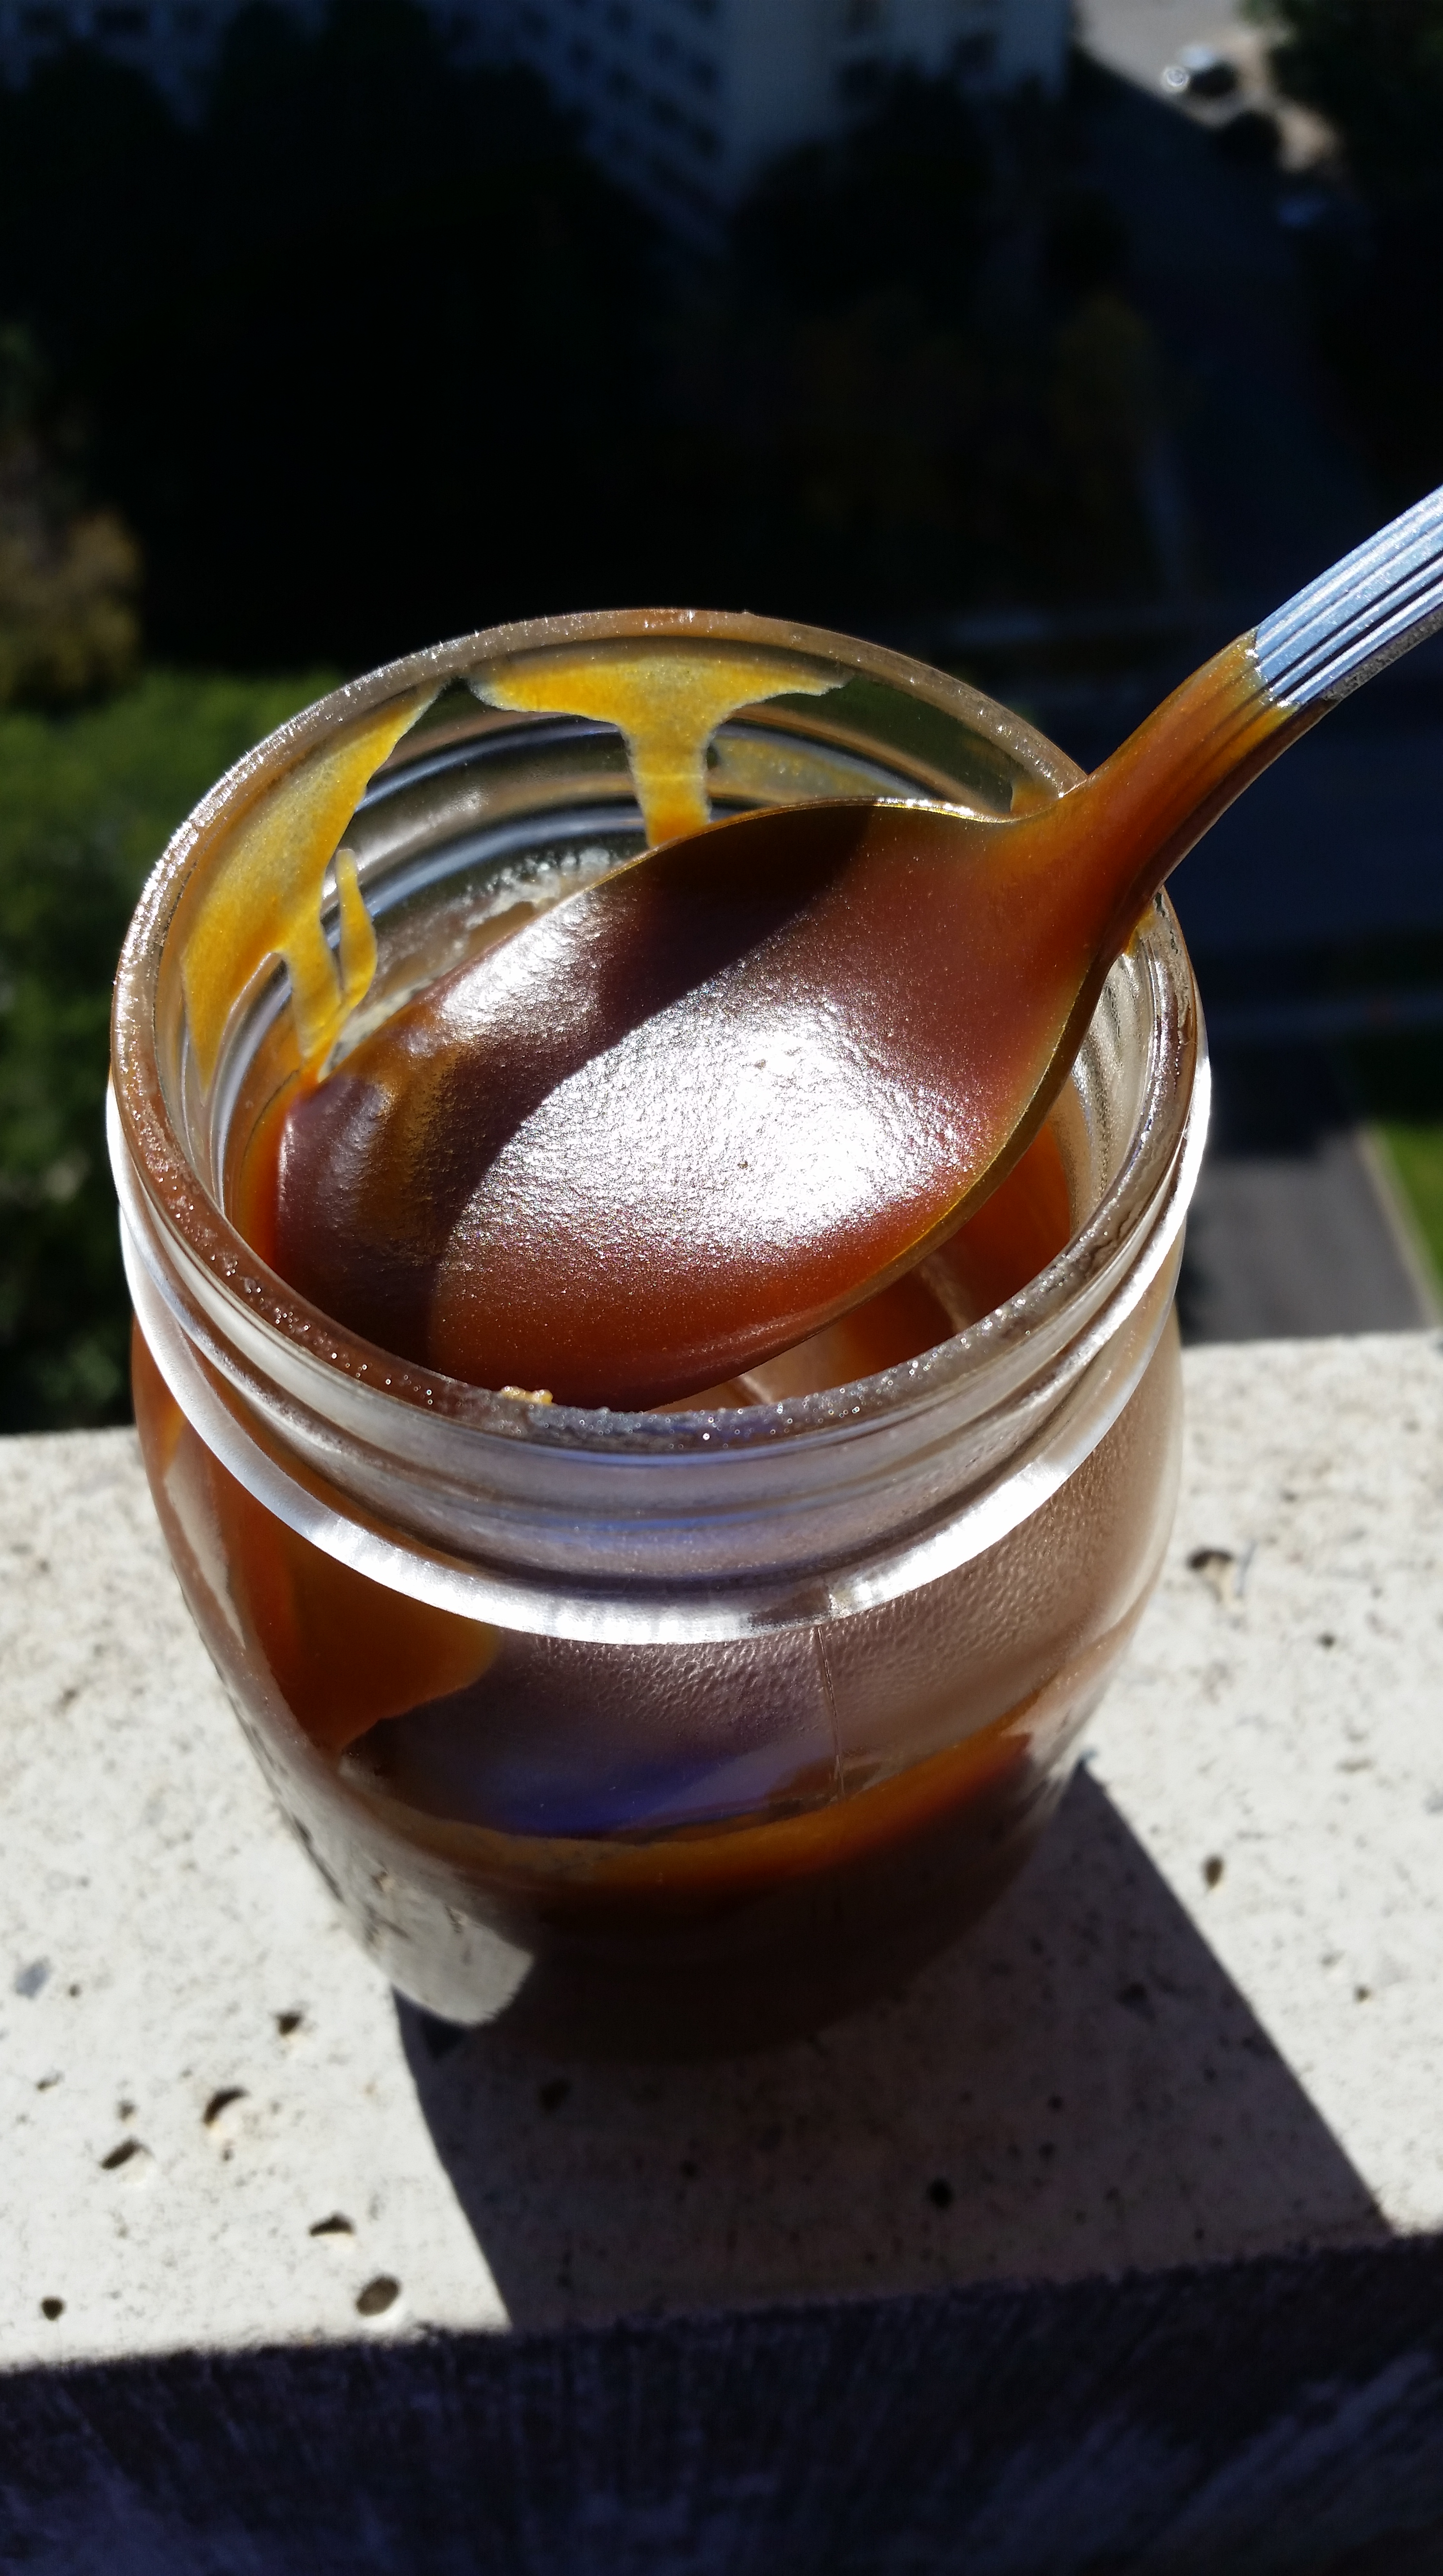
Although they look the same, one of these jars contains burnt caramel, and the other is delicious.

20140927_173736

I found this recipe on Bake Like a Pro. It took 6 tries before I got it to work. It’s about as much fun as making fudge. It seemed like a really simple recipe but I had a lot of trouble getting this right.

Time required: 4 hours  (1 hour of actual work)

Yields: about one cup

Total cost if you have none of the ingredients: $14

20140926_105832

Ingredients:

  • 1 C granulated white sugar
  • pinch of salt
  • 4 TBSP water
  • ⅓ C butter (cold)
  • ½ C heavy cream (room temp)

Instructions:

1. Add sugar, salt, and water to sauce pot, tilt pot to moisten the sugar. A ring of sugar crystals will form but pay it no mind.

20140926_122418

2. Heat on Low, occasionally tilting the pot, until all the sugar has dissolved and it starts to simmer. The mixture will have soapey-looking bubbles.

20140926_123210

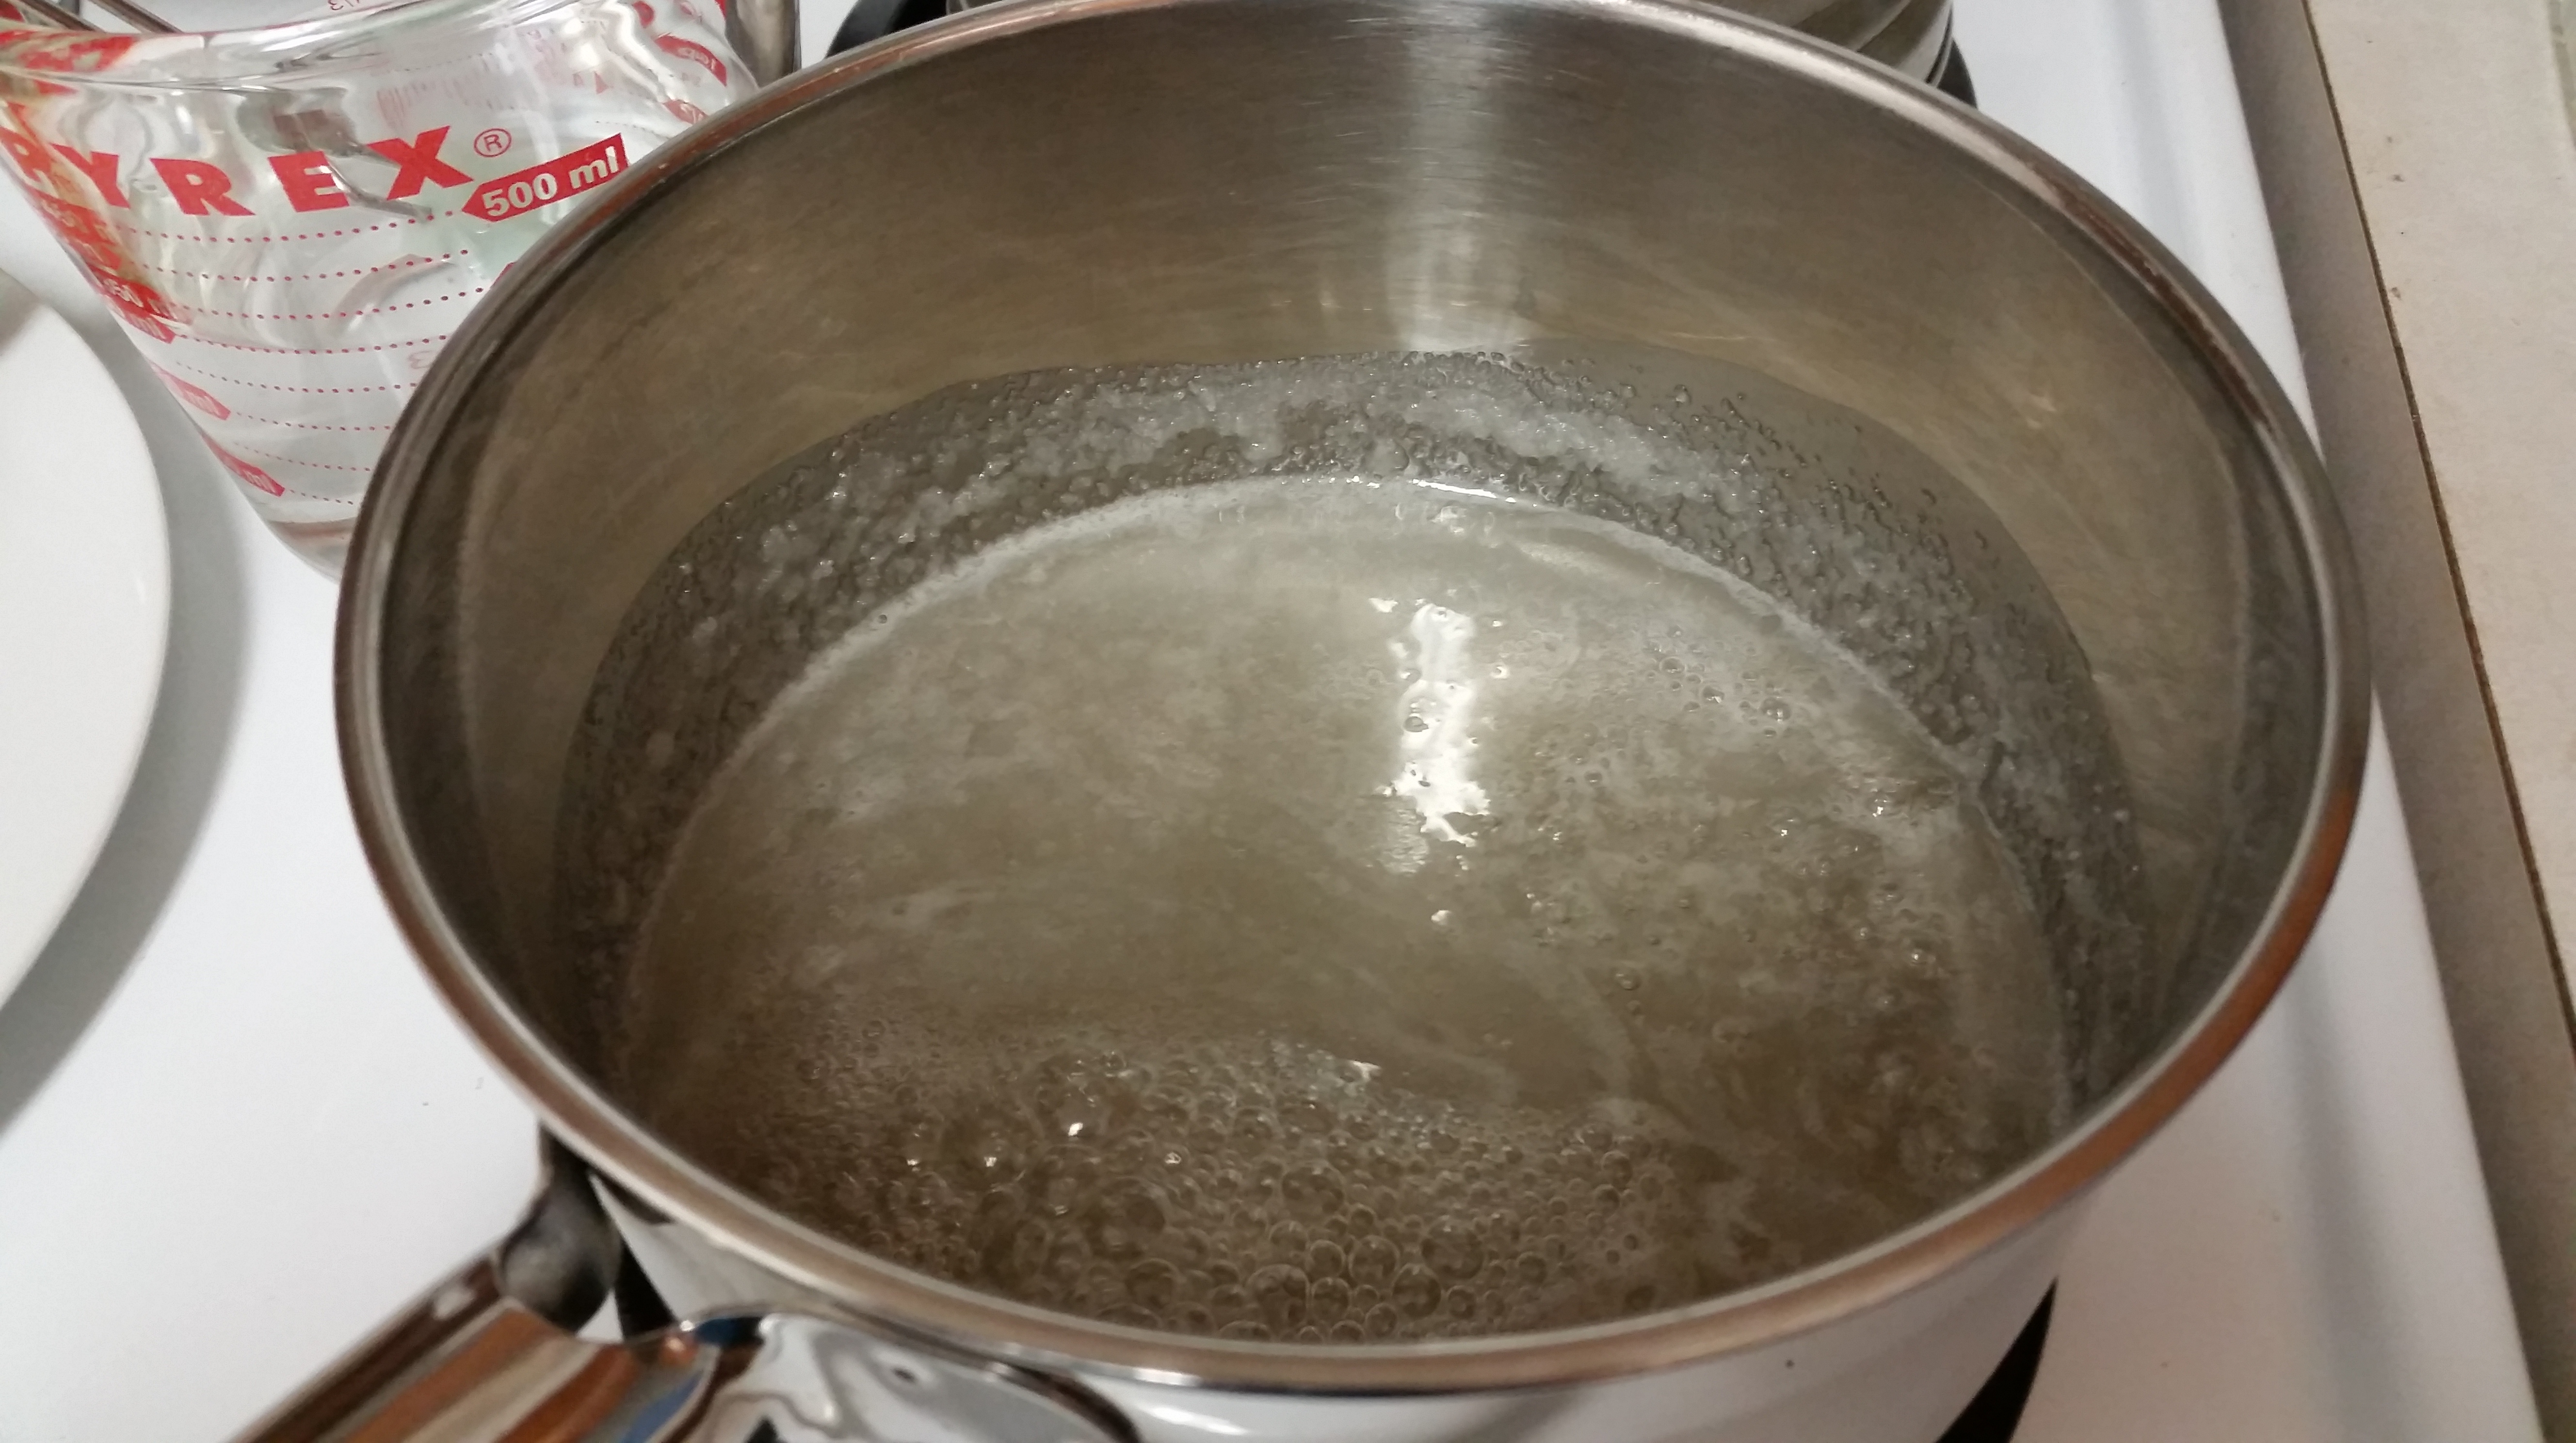
This takes forever and is really boring. Don’t leave your stove. I ruined the first batch that way.

Eventually it reaches full boil and the colour will subtly shift to gold. This part took about 25 minutes before I noticed the colour change. When you tilt the pot, a delightful aroma wafts up now.

20140927_105824

3. After about 6 minutes it will darken to orange. This is the part where it is caramelizing and developing a flavour. You don’t want to yank it off the heat too soon but you also don’t want it to darken to deep copper or it’s burnt at that point.

20140927_140753

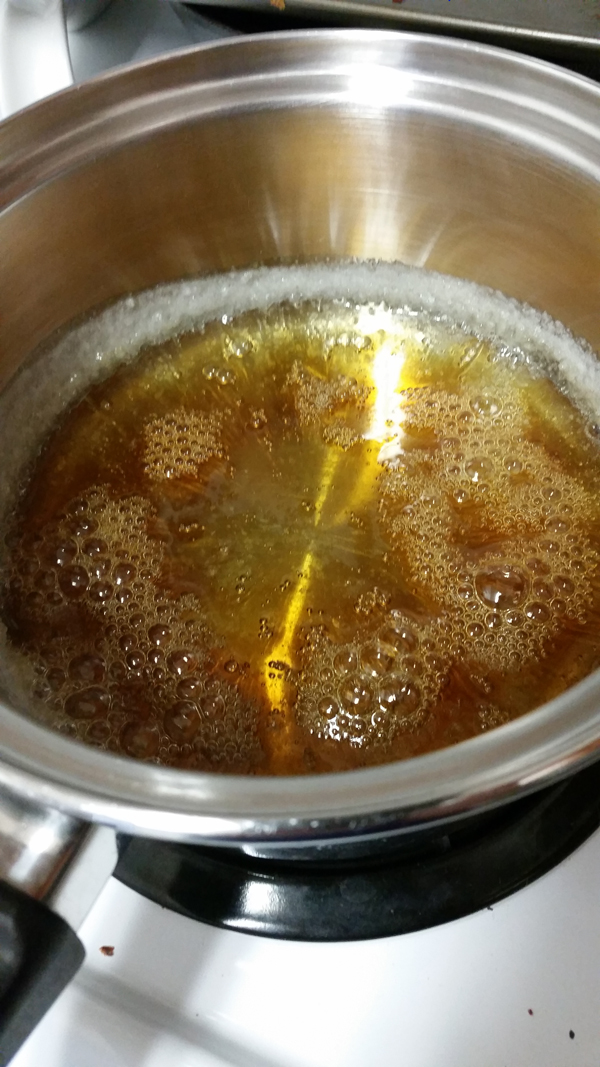
(I let it cook for 2 more minutes then removed from heat.)

4. Add cold butter and stir until completely melted.

20140927_140947

5. Add warm cream and stir until thoroughly mixed.

20140927_111513

6. Return to stove on Low, it took about 7 minutes to get back to a boil. I let it go for about 2 minutes then removed from heat.

7. Cool on counter 30 minutes. (On batch 3, I only cooled it 20 min and ran into temperature shock where the fat separated.)

8. A skim formed. Strained into mason jar and took it outside to admire because it was so pretty.

20140927_152107

9. Chill at least one hour and it will thicken up.

Verdict: FINALLY! I am too tired and hot to temper chocolate tonight, but I have liquid caramel. Stay tuned for what this goes inside.

Playlist: Nine Inch Nails

Advertisement

The big come down

Round 5 was doing so well. I thought I had it. Alas; it’s burnt and tastes vile. I sense I am almost there. This time the fat didn’t separate, and it has the right consistency. Am going to try one more time today. Focusing on: I have made caramel sauce. It doesn’t taste good, but it is caramel sauce.

There is a stage when the sugar is boiling, it takes on a golden tint, which quickly deepens and goes through several shades of orange before it attains a rich coppery red. Which is where I stopped. And that is too far. At this point it’s already burnt.

wpid-20140927_135241.jpg

Still not the caramel you are looking for

This is a classic case of denial. For two minutes it smelled like caramel. Then it changed. I ignored my olfactory senses and plowed ahead. Put it in a nice mason jar. Put it in the fridge. Ate a spoonful later. Which tasted about as good as what you’d imagine scorched caramel to taste like.

20140926_132241

Ugh I am so pissed off. I had it. It was golden and heavenly. And then that happened.


This is not the caramel you are looking for

Five minute caramel my ass.

20140920_124720

Was going to try making a better filled chocolate tonight after work. My caramel would have time to firm up in the fridge. If I had caramel. What I have is the reeking results of scorched sugar and a smoke detector freaking out and terrified cats. That’s what I have.

Chocolate avocado pudding

I know. It sounds weird. But it’s strangely delicious.

IMG-20130508-00036

I found this recipe in a book called Healthy Desserts, there is no author listed but the byline says Culinary Notebooks. I got it at Chapters.

IMG-20130508-00024

Time required: 1.5 hours

Yields: 3-4 puddings

Total cost if you have none of the ingredients: $24

Cost per pudding: $6

Kitchen implements I used:

  • food processor
  • ramequins

Ingredients:

  • 3 avocados, peeled and pitted
  • ½ C cocoa
  • ⅔ C honey
  • 1 tsp vanilla
  • dash of coarse sea salt

Instructions:

1. Peel and pit the avocados, and use a butter knife to gently separate the peel from the fruit. I fumbled one and dropped half an avocado on the floor so I didn’t have enough. Curse and scream as desired.

IMG-20130508-00027

2. Puree until smooth, and add everything except the salt. Mix well.

IMG-20130508-00029

During the taste test it was way too bitter so I doubled the amount of honey from ⅓C to ⅔C which improved things dramatically, however I find it now tastes a bit too honeyed. Foiled again.

IMG-20130508-00030

3. Spoon into ramequins and sprinkle with sea salt.

IMG-20130508-00032

5. Cover in plastic wrap and chill for an hour.

IMG-20130508-00034

Verdict:

“Here, try it.”

“No thank you.”

“You… don’t want it? Why not??”

“You said it was bitter!”

“That was before I added more honey! Try it. Before my feelings are hurt.”

“Okay… it tastes… like chocolate pudding.”

“But do you like it?”

“It tastes like chocolate pudding.”

“So that’s a yes?”

Playlist: Bat for Lashes – Siren Song

Strawberries and cream

Yes, it’s officially too hot to do anything else besides make whipped cream. Toronto is under a heat and smog alert, but I, dear reader, ventured forth into that humid desert to find some strawberries and heavy cream, to make the only thing I could think of which doesn’t involve using the stove.

Making whipped cream is so easy, only a total twit could screw it up. (I’ve screwed it up before.)

Pour heavy cream into a chilled bowl.  Turn the mixer on, gradually increasing to full speed, and within moments, voila! Boyfriend likes to add vanilla and sugar, but I didn’t add anything. (It’s also too hot to be creative today. )

Whip the hell out of it in your awesome mixer. Go Nemo go!!

And once the cream reaches the desired consistency (like 40 seconds or something ridiculously short like that), it’s ready!

Hopefully you have somebody you can convince to wash, dry, and hull the berries for you.

And enjoy!

Yum. I think I am going to make strawberry shortcake next time.

After we ate some berries, I decided the time was ripe to convince Boyfriend that we really need the ice cream maker attachment for Nemo. There are people who accessorize their home, and there are people who accessorize their pets. I just want to accessorize my beautiful appliance. Did I succeed? Stay tuned.

Playlist: Aimee Mann – Pavlov’s Bell

Rhubarb cobbler

When I was small, I lived beside an elderly man with a large vegetable garden. It was like having my own Mr. McGregor, and I was the rabbit unable to help myself from raiding his rhubarb.  Mmmm, pilfered produce! I am not sure why I ate so much of it, uncooked rhubarb can be quite sour, and I never did eat an entire stalk…

Tonight I made my first cobbler with the rhubarb I found in the market the other day. But will the fruits of labour be as sweet when the ingredients are purchased instead of purloined?

A cobbler is a layer of stewed fruit, covered by chunks of pastry, which are supposed to resemble a cobbled road after baking. This is a Better Homes & Gardens recipe.

I’m going to give a shout-out to Boyfriend’s mother for providing advice before I started. This whole “break topping / spoon topping” was confusing.

Time required: 1.5 hrs

Yields: 9 portions

Cost per portion: $4.00

Total cost if you have none of the ingredients: $36.00

Special kitchen implements I used:

  • flour sifter
  • 2 quart baking dish
  • cookie tray lined with tinfoil (to catch drippings)

Good to know before you start:

1. The leaves of the rhubarb plant are poisonous.

2. The stalks of the rhubarb plant are a natural laxative.

Topping ingredients:

  • 1 C flour
  • 2 TBSP granulated white sugar
  • ½ TSP baking powder
  • ½ TSP salt
  • ¼ C unsalted butter
  • 1 egg, slightly beaten
  • ¼ C milk

Filling ingredients:

  • 1 C granulated white sugar
  • 2 TBSP cornstarch
  • ¼ TSP cinnamon
  • 1 TBSP water
  • 1 TBSP butter
  • 4 C diced rhubarb stalks (about 6 stalks)

Instructions:

1. Pre-heat oven to 204°C / 400°F.

2. Wash rhubarb stalks and slice into one-inch pieces. Set aside.

3. In a large bowl sift together: 1 C flour, 2 TBSP sugar, baking powder, and salt.

4. Cut in butter until coarse crumbs form.

5. Slightly beat an egg and combine with milk.

6. Mix egg into crumbs until moistened. Set aside.

7. In a large pot, stir together: combine sugar, corn starch, cinnamon, water, and butter.

8. Add rhubarb, stirring until all pieces are coated.

9. Cook over medium heat for 10 minutes. Let mixture bubble, stirring occasionally.

10. Pour hot fruit mixture into baking dish. The dish has been placed onto a foil-lined baking tray to catch any overflow.

11. Immediately spoon topping onto rhubarb. (Try to make small mounds of pastry, I ended up with a… decorative spiral.)

12. Bake 20 min.

13. After baking, cool on wire rack at least 20 min. Scoop and serve.

Verdict: Delicious! This is the first time I’ve cooked with rhubarb, but it won’t be the last.

I used a 1.5 quart baking dish instead of a 2 quart one, mostly because I am short and lazy and couldn’t reach the bigger dish. However, I’m glad I used that size, because I found there was not enough fruit. I would use 6-8 cups next time, maybe 10 stalks?

I was really happy with how this turned out.

You can make cobbler with lots of different fruits, what would you choose?

Playlist: Wizardry V soundtrack

Patty’s peach-apple crisp

A golden blend of succulent fruit, crunchy oats, and sugar. But after a month of kitchen failures, can I possibly succeed?

I purchased a bag of apples recently, and left them on the kitchen counter as bait.  I was hoping to lure Boyfriend into the kitchen, and expected that once he saw those lovely apples, he would be overcome with the urge to make me an apple crisp. He hasn’t made one in forever, and I think I am overdue to receive one!

Alas it was not to be.  The apples ended up in the living room somehow, and I only just discovered them yesterday, and it was time to face the cold hard truth; if I wanted an apple crisp, I would have to make it myself.

I’ve never made my own apple crisp before, but I helped Boyfriend make one, two years ago. And by “helped” I mean I peeled the apples. Here goes!

Good to know before you start:

Apples collapse quite a bit during baking, so make sure they pile up nice and high above the edge of the dish or you’ll have a sunken crisp.

Adding water to a crisp will result in a softer topping. I prefer it to be crunchy as possible so I didn’t add water.

Preparing fruit for baking always takes forever.  The sugar and heat will brown the fruit any way so no need to add lemon juice.

Time required: 2 hours

Yields: 12 portions

Cost per serving: $2.58

Total cost if you have none of the ingredients: $31.00

Special kitchen implements I used:

  • glass baking dish, 8″ x 11.5″
  • cookie tray (to catch the overflow)
  • apple peeler & apple corer
  • pastry blender

Ingredients:

  • 8 apples
  • 4 peaches
  • 1/2 C granulated white sugar
  • 1 TBSP flour
  • 1 TSP ground cinnamon
  • 1 C quick rolled oats
  • 1 C flour
  • 1 C dark brown sugar, packed
  • 1/4 TSP: ground cinnamon, ground nutmeg, ground cloves
  • 8 TBSP butter (one stick)

Instructions:

1. Pre-heat oven to 191°C / 375°F.  (I waited until the fruit was sliced to do this.)

2. Peel and core fruit. Cut each apple slice in half, cut peaches to similar size. Place in baking dish for now.

3. In a large bowl combine: white sugar, flour, and cinnamon.  Add fruit to bowl, and toss until thoroughly coated, then transfer back to baking dish.

4. In a medium bowl, combine: oats, flour, dark brown sugar, cinnamon, nutmeg, and cloves. I may have mentioned this before but I REALLY LOVE BROWN SUGAR.

5. Cut in butter until coarse crumbs form.

6. Place baking dish onto cookie tray, and sprinkle crumbly mixture over fruit.

Yes. It's impossible to take a picture of your own thumb without looking like dweeb making obscene gestures.

7. Bake 40 min.

In which I discover the hard way that the oven mitts have a hole in them and almost dropped the dish on the floor. Owch.

8. Cool 1 hour and serve.

Verdict:

“Hmm. Pretty good,” I said around my spoon.

Boyfriend shook his head. “Not pretty good. Damn good!”

I read several recipes and saw that they all have pretty standard ingredients, so I just added another fruit and picked a sugar and spice ratio that seemed appealing to me. You could probably cut down the sugar, especially if you’re not going to use tart apples. I was really happy with this.

I chose peaches because I just re-watched Labyrinth for the millionth time and have them on the brain. Jareth, you can give me a peach any day.

You can use lots of different fruit in a crisp. What would you use?

Playlist: Labyrinth soundtrack

Hot fudge sauce

An “impact event” occurs when two celestial bodies collide. Chocolate being the food of the gods, a Baking impact event is when two flavours hit you like a bolt of lightning and your taste buds sing; everything changes and you dream up more ways to bring them together. That’s how I feel about hot fudge sauce and frozen yogurt. So simple, so delicious!

I made hot fudge sauce for Boyfriend tonight as a surprise. I learned to make this when I was 8 years old, it’s from Master Your Microwave which is available on Amazon.ca. The book stands out in my mind for 2 reasons; it was the first recipe I ever made of my own volition, an innocent time when I didn’t understand arcing and would put metal pans in the microwave to watch the pretty blue sparks. (Sorry Mom.)

Time required: 10 minutes

Yields: double batch

Total cost if you have none of the ingredients: $18.00

Cost per serving: minuscule

Kitchen implements I used: microwave & microwave-safe glass bowl

Ingredients:

  • 1 C granulated white sugar
  • 6 TBSP cocoa
  • 3 TBSP powdered cornstarch
  • pinch of salt
  • 1 C water
  • 4 TBSP butter
  • 2 TSP vanilla

Instructions:

Step 1 – in large glass bowl, combine dry ingredients

Step 2 – whisk in water

Step 3 – microwave on High for 8 minutes, stirring every 60 seconds.

It remains fairly watery until the 6 minute mark, and at that point it starts turning into a thick gelatinous goo (which was considered and discarded as a potential name for this blog):

After the 8 minute mark, it’s thoroughly thickened up:

Step 4 – stir in butter and vanilla, whisking until thoroughly combined

Step 5 – add to frozen yogurt…

… or stuff it into a cream puff. (Great idea Boyfriend!)

Verdict: delicious as expected! I used to make this all the time but haven’t made it in years, and found myself yearning for some tonight. Alas I had no bananas to add to my sundae. You could also make some fresh caramel, mmmmm.

Boyfriend said, “Oooh. That’s good. That’s really good. It’s like everything that’s good melting in your mouth at the perfect temperature.”