Patty’s apple strudel explosion

If a pastry explodes in the oven, does it make a sound? More importantly, does it still taste good?

IMG_1985

I researched how to make traditional strudel pastry but it sounds like a nightmare so, not today. I trawled the entire grocery store looking for phyllo pastry and discovered it’s kept near the frozen berries. This is my first strudel and I’m pleased with the results, however next time I’ll add raisins and reduce the lemon juice.

Shout-out to Boyfriend for being my camera man.

IMG_1980

Time required: 1.5 hours

Yields: 6 pieces

Total cost if you have none of the ingredients: $24

Cost per piece: $4

Kitchen implements I used:

  • large baking sheet
  • parchment paper

Ingredients:

  • 3 apples
  • 3 TBSP golden brown sugar
  • 2 TBSP water
  • ½ tsp ground cinnamon
  • ⅛ tsp ground nutmeg
  • 2 TBSP powdered corn starch
  • ¼ C lemon juice
  • 4 sheets of phyllo pastry
  • 2 TBSP melted butter
  • 3 tsp finely ground bread crumbs

Instructions:

1. Pre-heat oven to 350°F / 176°C. Line baking sheet with parchment paper and dust with flour.

2. Peel, core, and mince the apples. Toss them in a sauce pan with the water, brown sugar, cinnamon, and nutmeg. Bring to a simmer and cook on Med-Low for 10 min, stirring often.

IMG_1923

3. Combine corn starch and lemon juice, whisk until smooth, then add to cooked apple mixture and simmer for 1 more minute before removing from heat.

IMG_1922

We do not want juicy strudel.

IMG_1936

4. Place one piece of phyllo on the baking tray. Brush with butter, and sprinkle one teaspoon of breadcrumbs. Don’t stress about making this even, doesn’t really matter.

IMG_1925

Do this two more times, then add fourth and final layer (do not add butter or crumbs to top layer).

IMG_1930

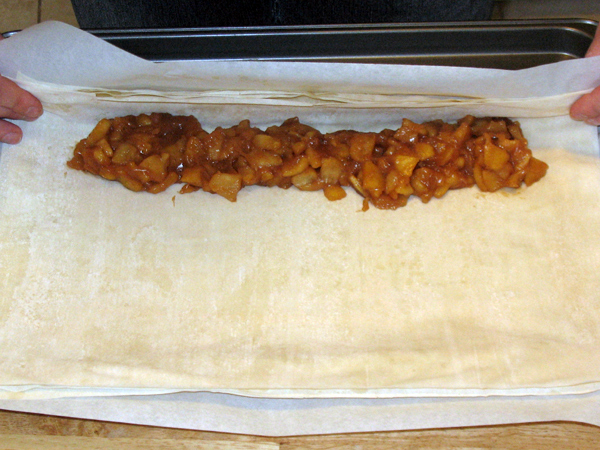
5. Spoon the filling down one side vertically, leaving room at the edges.

IMG_1944

Give camera man 2 thumbs up.

IMG_1949

6. Use the parchment paper to support the pastry as you lift it, you’re trying to tuck it over and under the apple filling, and then carefully roll it over like so. Once you’ve got the first turn, peel the parchment paper back towards you.

IMG_1950

IMG_1951

Keep turning it, and between turns try to smooth it with your hands to an even shape.

IMG_1952

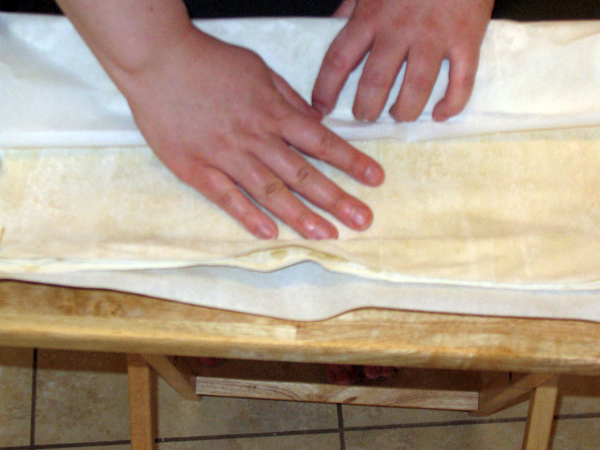
This was a little nerve-wracking, worried about tearing it.

IMG_1958

Roll it up 3-4 times until it’s at the edge.

IMG_1961

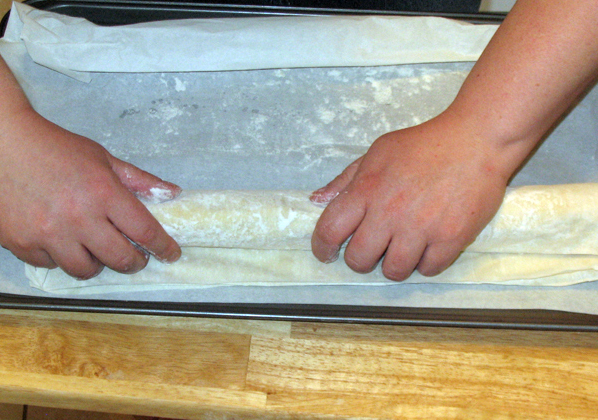
7. Brush butter inside the open edge then flip it so the seam is on the bottom. Tuck the ends in.

8. Dust with a cinnamon sugar mix.

IMG_1974

9. Bake 20-25 min until golden brown.

10. Cool on rack at least 5 min before serving. Mein gott! What is this?

IMG_1981

Verdict:

You want to get judged harshly? Tell people in advance you are using phyllo instead of making the pastry yourself. 

Response from best friend: “0_0 That is really shocking.”

This was fairly simple to make. Aside from the explosion, it turned out great. I may have had a tantrum when I saw that, but I cut it in thirds first, and got 4 nicely sliced pieces, and 2 messy pieces. Cutting through the strudel after it’s baked it harder than I anticipated.

Playlist: Eric Carmen – Hungry Eyes

Advertisement

Rhubarb apple crumb bars

The only thing more sour than rhubarb is a spiteful girlfriend. I baked this to get even with Boyfriend who went out of town for the weekend, alas. Eat your heart out.

Yes I am that petty. I adapted this from the “blueberry crumb bars” in Good Housekeeping Brownies: favourite recipes for Blondies, Bars & Brownies, which is available on Amazon.com and Amazon.ca.

I have a few plans to make this turn out better than the first attempt at a fruit crumb bar, which was a burnt nightmare. I think I can get it right this time.

Good to know before you start: The high butter content will easily burn. To prevent this, cover the entire dessert with tinfoil, bake  30 minutes at a high temperature, then remove tinfoil and bake  an additional 25 min at a lower temperature. This ensure the fruit filling is properly cooked but the topping doesn’t burn.

Time required: 2.5 hrs

Yields: 36 piece

Cost per bar: $1.39

Total cost if you have none of the ingredients: $41.00

Kitchen implements I used:

  • baking pan: 10.5″ x 14.5″
  • tinfoil
  • KitchenAid mixer
  • pastry blender

Crust ingredients:

  • 1 C butter, softened (2 sticks)
  • ⅔ C icing sugar
  • 1 TSP pure vanilla extract
  • 2½ C flour

Filling ingredients:

  • 4 C rhubarb, washed and diced
  • 4 C tart apples, peeled, cored, and diced
  • ½ C granulated white sugar
  • 3 TBSP powdered corn starch
  • 2 TBSP water

Topping ingredients:

  • ⅔ C quick-cooking oats, uncooked
  • ½ C flour
  • ⅓ C brown sugar, packed
  • ¼ TSP cinnamon, ground
  • ½ C butter, slightly softened  (1 stick)

Instructions:

1. Pre-heat oven to 190.5°C / 375°F. Line baking pan with foil.

2. Prepare the fruit and set it aside.

3. Prepare crust: in mixer beat the butter, icing sugar and vanilla.

Beat until light and fluffy.

4. Add flour and mix until just combined.

5. Use hands to press dough into baking pan, bake 20 min.

6. Cool on rack 5 min.

7. Meanwhile prepare filling: in a large sauce pan, combine sugar, corn starch, and water.

Add fruit. Bring to a boil over Medium heat, reduce heat and simmer for 5 minutes. Stir often.

8. Meanwhile prepare topping: in a medium bowl stir: oats, flour, brown sugar, cinnamon.

9. Cut in butter with pastry blender, and blend until you have coarse crumbs.

10. Spread fruit mixture evenly over crust.

11. Use hands to sprinkle topping over fruit.

12. Cover with tinfoil and pierce with fork. Bake 30 min.

13. Remove tin foil after 30 min, and lower temperature to 160°C / 320°F. Bake for an additional 25 min.

14. Cool completely in pan before slicing.  When ready to serve, lift from pan, peel foil off the bottom.  Slice lengthwise into 6 strips, then crosswise into 6 pieces.

Verdict: My plan to taunt Boyfriend failed miserably! This was partially assembled when I found out he would be home at 3:30, right when it finished cooling. Foiled!

I decided to be kind and let him have some.

These were delicious. The crust reminded me of shortbread, very buttery and soft.  The rhubarb and apples were nice and tart. The only thing I’d change is to add two more stalks of rhubarb.

I will retry the apple-only version at some point and believe that if I use the tinfoil trick it should be fine.

Playlist: Sailor Moon Super S movie

I am now convinced anything with rhubarb will turn out awesome and make me feel like a baking super star. What rhubarb dessert is your favourite?

Patty’s peach-apple crisp

A golden blend of succulent fruit, crunchy oats, and sugar. But after a month of kitchen failures, can I possibly succeed?

I purchased a bag of apples recently, and left them on the kitchen counter as bait.  I was hoping to lure Boyfriend into the kitchen, and expected that once he saw those lovely apples, he would be overcome with the urge to make me an apple crisp. He hasn’t made one in forever, and I think I am overdue to receive one!

Alas it was not to be.  The apples ended up in the living room somehow, and I only just discovered them yesterday, and it was time to face the cold hard truth; if I wanted an apple crisp, I would have to make it myself.

I’ve never made my own apple crisp before, but I helped Boyfriend make one, two years ago. And by “helped” I mean I peeled the apples. Here goes!

Good to know before you start:

Apples collapse quite a bit during baking, so make sure they pile up nice and high above the edge of the dish or you’ll have a sunken crisp.

Adding water to a crisp will result in a softer topping. I prefer it to be crunchy as possible so I didn’t add water.

Preparing fruit for baking always takes forever.  The sugar and heat will brown the fruit any way so no need to add lemon juice.

Time required: 2 hours

Yields: 12 portions

Cost per serving: $2.58

Total cost if you have none of the ingredients: $31.00

Special kitchen implements I used:

  • glass baking dish, 8″ x 11.5″
  • cookie tray (to catch the overflow)
  • apple peeler & apple corer
  • pastry blender

Ingredients:

  • 8 apples
  • 4 peaches
  • 1/2 C granulated white sugar
  • 1 TBSP flour
  • 1 TSP ground cinnamon
  • 1 C quick rolled oats
  • 1 C flour
  • 1 C dark brown sugar, packed
  • 1/4 TSP: ground cinnamon, ground nutmeg, ground cloves
  • 8 TBSP butter (one stick)

Instructions:

1. Pre-heat oven to 191°C / 375°F.  (I waited until the fruit was sliced to do this.)

2. Peel and core fruit. Cut each apple slice in half, cut peaches to similar size. Place in baking dish for now.

3. In a large bowl combine: white sugar, flour, and cinnamon.  Add fruit to bowl, and toss until thoroughly coated, then transfer back to baking dish.

4. In a medium bowl, combine: oats, flour, dark brown sugar, cinnamon, nutmeg, and cloves. I may have mentioned this before but I REALLY LOVE BROWN SUGAR.

5. Cut in butter until coarse crumbs form.

6. Place baking dish onto cookie tray, and sprinkle crumbly mixture over fruit.

Yes. It's impossible to take a picture of your own thumb without looking like dweeb making obscene gestures.

7. Bake 40 min.

In which I discover the hard way that the oven mitts have a hole in them and almost dropped the dish on the floor. Owch.

8. Cool 1 hour and serve.

Verdict:

“Hmm. Pretty good,” I said around my spoon.

Boyfriend shook his head. “Not pretty good. Damn good!”

I read several recipes and saw that they all have pretty standard ingredients, so I just added another fruit and picked a sugar and spice ratio that seemed appealing to me. You could probably cut down the sugar, especially if you’re not going to use tart apples. I was really happy with this.

I chose peaches because I just re-watched Labyrinth for the millionth time and have them on the brain. Jareth, you can give me a peach any day.

You can use lots of different fruit in a crisp. What would you use?

Playlist: Labyrinth soundtrack

Charred apple crumb squares

Few desserts really include a synonym for “burnt” in their name, and sadly, this isn’t one of them.  Foiled by my own hubris, burnt apple crumble. :[

This recipe is the last one that I plan to post from Good Housekeeping Brownies: favourite recipes for Blondies, Bars & Brownies, which as always is available on Amazon.com and Amazon.ca.

Good to know before you start: I did this recipe backwards.  You are supposed to cook the apple filling before baking the crust on its own.

It doesn’t matter if the apples brown.

I have read that 4 pounds of apples equals about 8-9 medium sized apples. I used 8 and that was not enough by far.  You’ll see why soon enough.

Time required: 3 hours

Yields: 24 pieces

Cost per square: $1.63

Total cost if you have none of the ingredients: $39.00

Special kitchen implements I used:

  • baking pan: 14½” x 10½”
  • tin foil
  • plastic wrap
  • apple peeler & corer
  • pastry blender

Crumb topping:

  • 1 C flour
  • ½ C butter (1 stick), softened
  • ½ C dark brown sugar, packed
  • 1 TSP ground cinnamon
  • 1 TBSP vanilla extract

Crust:

  • 3 C flour
  • ⅓ C granulated white sugar
  • ¼ TSP salt
  • ¾ C cold butter (one and a half sticks)

Apple filling:

  • 4 lbs of tart apples
  • 4 TBSP butter
  • ¾ C dark seedless raisins
  • ½ C dark brown sugar, packed
  • ¾ TSP ground cinnamon
  • 1 TBSP powdered cornstarch
  • 2 lemons (need 3 TBSP fresh lemon juice)

Instructions:

Step 1 – Prepare topping: in a medium bowl combine all the ingredients with your hands.

I added the vanilla after the first 4 were combined.  Just pick it up and squish it through your hands, working all the ingredients into each other.

Ugh I hate touching stuff with my hands. That is why I fail at gardening.

Squash it into a ball-type shape, cover in plastic wrap, and chill.

Step 2 – Preheat oven to 191°C / 375°F.  Line baking pan with tin foil.  Grease foil.

Step 3 – In a large bowl, mix flour, salt, and white sugar.  Use pastry blender to cut in butter.

Keep doing this tedious task until the mixture resembles fine crumbs.

Step 4 – Press mixture into prepared pan by hand and bake 20 min.  It’s normal for crust to crack.  Meanwhile!

Step 5 – Prepare apple filling; peel and core the apples, and cut each slice into thirds.  In a large skillet on Medium heat, cook: apples, raisins, brown sugar, and cinnamon.

Stir often, this should take 25 min.  It’s done when the apples are tender and most of the liquid has evaporated.

Step 6 – Mix the cornstarch and lemon juice, and stir that into the apple mix to thicken it up.

Step 7 – “Use spoon to spread the filling over hot crust”. Oh dear. How did the apples burn in the one minute it took to add the lemon juice? Oh my God. This is dreadful.

Step 8 – Why don’t I have enough apples!? I tried spreading it evenly, but it became obvious there wasn’t enough filling. I smoothed it back over to the side, figuring the naked part on the end will be a casualty of this experiment.

Step 9 – Take topping out of fridge, break into crumbs (??) and spread onto filling. Hmmmm. I’m betting it is not supposed to look like this.

Step 10 – Bake 40 minutes until topping is golden.

Cool completely in pan (1-2 hours) on wire rack.

Dear God… what kind of horror is this?

Step 11 – To serve, lift dessert out of pan, peel foil off. Cut lengthwise into 4 strips, then cut crosswise into 6 squares if you are feeling adventurous.

Verdict: The topping is burnt, and the filling is very burnt, in a not-so-subtle flavour I like to call “charred”. Who knew a dessert that smelled so good in the making could go so wrong? I had high hopes for this, you know, until it went to hell and all.

I think this definitely has potential, it would probably be really good if it hadn’t burned and if I understood how to crumble the topping to make it look presentable.

The disappointment of slaving over something that smells like apple pie, and ruining it, reminds me of this passage:

“I hope I never smell the smell of apples again!” said Fili. “My tub was full of it. To smell apples everlastingly when you can scarcely move and are cold and sick with hunger is maddening. I could eat anything in the wide world now, for hours on end – but not an apple.” – The Hobbit

Playlist: Sailor Moon Japanese soundtrack

Patty’s apple caramel honey cheesecake

The other night I polled my readers, to find out what people thought would taste best with an apple dessert; and honey won. So here is my apple caramel honey cheesecake.

Whew.  Try saying that 3 times fast.  This sweet number is made from a bed of spiced honey graham crackers, covered in fresh tart apples, homemade caramel sauce, and a cream cheese filling made with honey and applesauce.

I was planning to post this the day after the poll, but hit a minor snag.  Well…okay, more of a giant snag. More on that later.

Good to know before you start:

There is a significant time gap between baking the crust, and baking the entire cake, so once the crust is done, shut off the oven, and remember when you turn the oven back on, a lower temperature is used.

Because the crust is chilled before the filling is added, you don’t want to put a cold pan into a hot oven.  You will need to either chill the crust and caramel, then let it sit until it reaches room temperature, or transfer the crust into a new pan already at room temp.

Notice anything new? Or blue? 😀

Time required: 2 days (4 hrs + overnight chilling)

Yields: 40 pieces

Cost per portion: $1.20

Total cost if you have none of the ingredients: $48.00 (sheesh, glad I just needed apples)

Special kitchen implements I used:

  • electric mixer
  • baking pans: 9″ x 13″ nestled inside a 14.5″ x 10.5″
  • tinfoil & plastic wrap

Crust ingredients:

  • 6 TBSP unsalted butter
  • 1¾ C honey graham cracker crumbs
  • ⅛ TSP ground nutmeg
  • smidgen of ground cloves
  • 2 tart apples, (peeled, cored, minced) ADD AFTER CRUST IS BAKED

Caramel ingredients:

  • ¾ C dark brown sugar
  • 5 TBSP unsalted butter
  • ½ TSP ground cinnamon
  • ½ C heavy cream

Filling ingredients:

  • 4 blocks of cream cheese, softened
  • 1¼ C granulated white sugar
  • 2 TBSP powdered corn starch
  • ¼ C unsweetened apple sauce
  • 1 TBSP Billy Bee honey
  • ¼ C heavy cream
  • 5 eggs, room temp

Crust instructions:

Step 1 – Use centre rack.  Pre-heat oven to 175°C / 350°F.

Step 2 – Line a 9″ x 13″ baking pan with tinfoil, and grease it.  If you turn the pan upside down and wrap the foil around the outside to get the shape this is easier.

Step 3 – In sauce pan on Low, melt butter.

Step 4 – Combine graham cracker crumbs with nutmeg and cloves, and stir into butter.

Step 5 – remove from heat and press into prepared pan.

Bake 10 min AND TURN OFF THE OVEN.

Step 6 – shred or mince the apples

Step 7 – while crust is cooling, mince 2 apples, and spread this directly over the crust.  Leave on cooling rack.  (There are two different colours here because I did not mince the apples at the same time and one browned a bit.)


CARAMEL INSTRUCTIONS:

Step 8 – in a sauce pan on Medium, melt sugar and butter, whisking often.

Step 9 – When it starts to boil, stir in the cinnamon and remove from heat.

Step 10 – Stir in cream, return to heat until bubbly.

Step 11 – Carefully pour this onto crust, use spoon to spread it to the edges.

Step 12 – Refrigerate at least one hour.  (Before this can go in the oven later with the filling, this pan needs to be room temperature so you’ll need to let it sit or transfer to a new pan.)

FILLING INSTRUCTIONS:

Step 13 – now pre-heat oven to 150°C / 300°F.  Fill kettle and turn on Low, now.

Step 14 – Beat cream cheese on Medium until smooth.

Step 15 – One by one, beat in (and ensure each ingredient is thoroughly blended before adding the next) add: sugar, corn starch, apple sauce honey, and heavy cream.

Go magic mixer, go go go!!!

Step 16 – On Low speed, beat in eggs, one at time, until just blended.

Step 17 – Pour filling onto crust.

Step 18 – Place the pan containing your cake into a larger pan, and fill the large pan with boiling water to form a bain marie.

Step 19 – Bake 65 minutes, it is done when edges are set but centre jiggles.  (Do you see that odd colour in the centre?  That’s what happens when you scrape the bowl of cream cheese and get the pieces that weren’t properly beaten into your cake. Grrrr.)

Step 20 – Cool on rack at least one hour, cover with plastic wrap and chill overnight, before using a hot knife to slice into pieces.  (I blotted the top with paper towel as some condensation had developed.)

Verdict:  Surely a piece of cheesecake made with real apples must have some tiny health benefit, yes? Loved this.

You know, I am totally over the idea of making cheesecake in a round springform pan.  Never again. I get consistently better results when I use a rectangular baking pan.

To create my recipe, I planned a small, round cheesecake, and cut out as much of the eggs and cream cheese as I could, reasoning that since the filling is always quite high, I could probably get rid of 50% of it and still have a tasty cheesecake.  Um, no.

The first attempt ended in total disaster.  It literally disintegrated in my hands; cracking, deflating, and sliding apart.

This was particularly disappointing because it was the first dessert I made in my new KitchenAid mixer.  (Which is a cobalt blue Artisan tilt-head beauty!)

I consulted my cheesecake guru, and she thought the problem might be too much liquid, not enough cream cheese, and not enough time in the oven. I want to be clear: the mixer was not to blame!!

So I went back to the drawing board, played around with my ingredient ratios,  tried a different pan, and baked it a little longer. Success, how sweet it is!

I have arrived at a strange point in my life, where kitchen appliances excite me to a level I thought was gone past all recall. Eh.  Excuse me, I have to go stare at my beautiful blue mixer for awhile.

Playlist: Labyrinth soundtrack

An apple and what?

I’m making something new tonight, in about two and a half hours. I want your opinion on something.

The dessert will have two major components; apples, and either honey, vanilla, or lemons.  I can’t decide! Vote for the option you think would taste best. XD

I’ll check poll results at 10pm EST and you will see the finished product tomorrow morning.

Excuse me, I have to go harass my family into voting now…

UPDATE: 10:02pm – voting over, honey won. Tune in tomorrow!

Spiced apple & pears

Imagine a warm bowl of apple sauce, with chunks of apple and pear, spiced with cinnamon, cloves, and vanilla bean. While it’s cooking, the most tantalizing smell will have you finding excuses to linger in the kitchen. A sweet topping so warm that it melts the frozen yogurt underneath.

I found this recipe in a book that my mother gave me, Slow Cooker Magic in Minutes, which is available on Amazon.com and Amazon.ca.

It’s a hard cover book with a ring binding and colour photos, with lots of different slow cooker recipes, including some delicious desserts. Prior to reading this I was not aware you could make a dessert in a crock pot. I thought the idea was a little odd, actually, before I tried one. Turns out that slow cooked desserts are amazing!

Good to know before you start:

Sometimes vanilla bean can be substituted with vanilla extract. This is not one of those times. Get the bean! Your taste buds will thank you.

After this has finished cooking and you’ve had a bowl, the rest should be covered and refrigerated. Later you’ll notice that fat rises to the surface (just like stew). Skim that off, and heat the portion that you want to serve.

Don’t use over ripened fruit unless you enjoy the feeling of something disintegrating in your hands. On that same note, if your pears are not quite ripe that is okay, wooden pears are fine for this.

Use either 6 medium-sized fruits or 5 large ones.

getting started

Time required: 6 hours (70 min prep time, the rest is slow cooking time)

Yields: a lot, you will run out of ice cream before you run out of topping

Total cost if you have none of the ingredients: $30.00

Kitchen implements I used:

  • apple peeler & apple corer
  • slow cooker

Ingredients:

  • 5 tart apples
  • 5 pears
  • 8 TBSP butter, unsalted (one stick)
  • 1 vanilla bean
  • 1 lemon (use half)
  • 1 cinnamon stick
  • ½TSP cloves, ground
  • ½ C water
  • 1 C brown sugar, packed

Step 1 – Peel and core apples and pears. Cut each apple slice in thirds, cut each pear slice in half. Place in slow cooker. Don’t worry about the fruit browning.

Cut each apple slice into thirds, and check the middle piece for any core remnants:

Slice the pears horizontally (errr… diagonally):

Place the flat part of the pear on the cutting board and core it, and then each pear slice should be cut in half:

Step 2 – Melt butter in sauce pan on Low.

Step 3 – Add all other ingredients to butter:

  • split and scrape vanilla bean, add seeds and pod
  • cut cinnamon stick in half, add both halves
  • use half of lemon, peel it and remove seeds, add pulp and juice
  • then add brown sugar, cloves, and water

Step 4 – Bring pot to a boil, and boil for 1 min, stirring often.

Step 5 – Pour liquid over apple and pears. Stir until mixture coats all fruit. Bury the bean pod and cinnamon sticks under the fruit.

Step 6 – Cover and cook, stirring every 45 min.  Cook times vary. The book recommends either up to 4 hours on Low, or up to 2 hours on High.

I cook it at leat 5 hours on High and I’ll show you why.

After 45 minutes:

After 90 minutes:

After 135 minutes:

After 180 minutes:

I think it’s best when the fruit has broken down to this stage and everything is soft. It’s a very versatile dessert. I have enjoyed it several ways; served warm on its own, or on top of a bowl or vanilla frozen yogurt, and on pound cake.

warm spiced apple and pear fruit toppingThe book also recommends with whipped cream, crème anglaise, or sponge cake, but I haven’t tried these last three.

One dish of spiced apple pears a day keeps the winter chill away!

Apple cake with cream cheese frosting

This was a delicious accident. It was supposed to be my first carrot cake, but instead became my first apple cake, with cream cheese frosting.

apple cake with cream cheese frosting

Back in November I purchased Betty Crocker Baking Basics – recipes and tips to bake with confidence, which is available on Amazon.com and Amazon.ca. It’s been a very useful book.

I planned to make the carrot cake recipe but didn’t have any carrots, so I went to the store, and was promptly distracted by the shiny apple display. I came home and emptied my shopping bag, perplexed with what to do with a bag of Granny Smith apples and cream cheese.

Not to worry! A spice cake can be made with either apples or carrots, and all the other ingredients remain the same

Good to know before you start:

This cake is perfectly delicious without frosting at all, however if you intend to frost this, take the cream cheese out of the fridge now.

After frosting cake must be refrigerated. Let frosting set before cutting.

getting started

(Here is the moment I realized I bought apples instead.)

Time required: 2 hours

Yields: 32 squares

Cost per slice: $1.63

Total cost if you have none of the ingredients: $52.00

Kitchen implements I used:

  • apple peeler & apple corer
  • spatula (do not use a flexible one)
  • baking pan: 9″ x 13″
  • electric beaters

Cake ingredients:

  • 3 tart apples (or 6 medium carrots)
  • 1½ C granulated white sugar
  • 1 C vegetable oil
  • 3 eggs, room temp
  • 2 C flour
  • 1½ TSP ground cinnamon
  • 1 TSP baking soda
  • 1 TSP vanilla
  • ½ TSP salt
  • ¼ TSP ground nutmeg

Frosting ingredients:

  • one package (8 oz) cream cheese, room temp
  • ¼ C butter (half a stick or 4 TBSP), room temp
  • 1 TBSP milk
  • 1 TSP vanilla
  • 4 C icing sugar

Step 1 – preheat oven to 176°C / 350°F, centre rack. Grease and flour baking pan.

Step 2 – peel apples, core apples, and dice into small pieces. Set aside.

apple peelers are GREATso are coring devices

Step 3 – in medium bowl combine:  flour, cinnamon, nutmeg, baking soda, and salt. Set aside.

Step 4 – in large bowl, beat on Low for 30 seconds: sugar, oil, vanilla, and eggs.

Step 5 – beat dry ingredients into wet, adding a third at a time until blended. Once all dry mixture is added, beat on Low for 1 min, frequently scraping the sides.

adding dry to wet

Step 6 – using a hard spatula, stir apple pieces into batter

never using a flexible spatula again

Step 7 – “pour” (hah!) batter in greased pan, use spatula to smooth batter down. Shake pan and let it settle for a few minutes, then place in oven.

Step 8 – bake 40-45 min, it’s done when toothpick inserted in the centre comes out clean. Cool cake in pan, on rack, at least 1 hour.

Step 9 – remove cake from pan and make your frosting.

Step 10 – forgot to take pictures of making the frosting but it wasn’t that exciting anyway:

  • In medium bowl on High, beat the cream cheese until smooth.
  • Add butter, milk, vanilla, and beat on Low until smooth.
  • Still on Low, beat in icing sugar, one cup at a time, until mixture is smooth and spreadable.
  • Store frosted cake in fridge, covered.
  • Let frosting set before cutting cake. Oops.

You can’t tell, but before frosting this I cut off a piece to try the cake on its own. Yum.

mmm I love creamcheese frosting

apple cake with cream cheese frosting

Verdict: I loved this. Boyfriend’s reaction was lukewarm.

Two things I’ll change next time; use apple sauce instead of vegetable oil, and instead of frosting the cake after it cools, I’m going to make the frosting and put it in the fridge, and just frost pieces as they are served because storing a frosted cake in the fridge was irritating.

My favourite part of making this dessert was that while baking, it perfumed my whole home with spiced apple goodness.