Silicone candy mould review

When you’re building your chocolate inventory you come to a fork in the road, silicone moulds or polycarbonate. I went with silicone, mostly since I didn’t know what polycarbonate was, and the merchant had silicone. Zero research went into my purchase. Did I make the right decision?

20160805_105907

I bought my first mould in 2011 at a baking show, and bought the rest from Golda’s Kitchen and Chocolat-chocolat Inc.  The majority of my collection are Fat Daddio’s moulds. I’ve used them for our Christmas chocolates for 5 years so far.


What I like about silicone moulds:

They’re durable.

They’re fairly inexpensive, Golda’s sells them for $11.25 each and Chocolat-chocolat has my Christmas mould on sale for $3.95

They’re quiet, no whacking them on the counter to dislodge the chocolate.

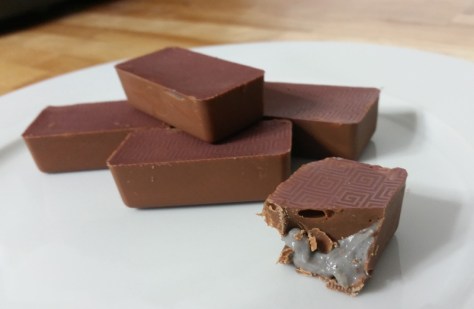
They come in a variety of visually interesting shapes.

20160805_110001

What I dislike:

Are you wondering why the moulds are wet? I just washed them. But I washed them before I put them away in January. There is a huge problem with silicone, a powdery white substance forms on it. It looks like dishwater detergent, but it’s not.

20160805_104349

From what I read on Rowley’s Whiskey Forge, it was determined by a silicone manufacturer to be:

We actually did a chemical breakdown test on this white residue from a tray that we received back from a customer and the result of that test is below. The compound associated with the residue is Calcium Sulfate – meaning basically the residue is associated with the chemicals in hard water. Like a mineral deposit.

However, the comments on the article found that even using distilled water didn’t cure the problem, so I am at a loss.

Obviously I can’t have this white substance on my chocolates, so we have to wash and dry them again before using them which is a huge pain in the ass. It wastes a lot of my time.

On the other hand, where I live discourages making loud noises and the noise that polycarbonate moulds make is significant.  (I got to try them at the McCall’s chocolate course I took with Spousal Unit. Very cool but very loud.)

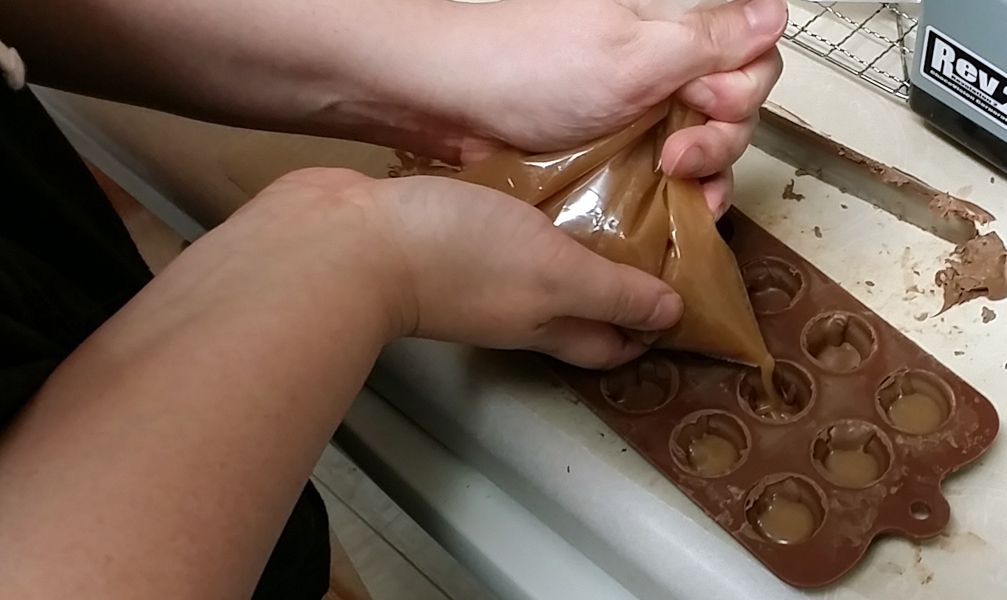
It’s hard to remove air bubbles when using silicone moulds. The mould can warp in your hands if you pull it too tight, so my method is to place the mould on a cookie sheet and whack that on the counter.

Verdict:

Perhaps if I could go back in time I’d choose polycarbonate. On the other hand, all the whacking would upset my cats. So perhaps silicone was the best choice for me in the end.

Update Aug 8, 2016:

I emailed Fat Daddio’s about the residue and they replied:

I’m sorry to hear about your issues, it sounds incredibly frustrating.

It typically is a reaction to hard water, as well as oils that collect from whatever you’re using the molds for (the chocolates, in this case), as well as any other oily products that might be washed in the same sink sometimes.

We recommend putting the molds in boiling water, which should remove much of the accumulated oily build up. After that, washing them gently with a dish soap, like Dawn, should thoroughly clean them. You don’t have to boil them every time you use them, but every now and then it helps deep clean them.

If that doesn’t work, let me know.


(Once I try this I’ll update this post.)

Advertisement

CakeBoss software review

Spousal Unit gave me the CakeBoss software for Christmas 2015, something I’ve been eyeing for a few years. I’ve had 7 months to play around with it, and I love it. CakeBoss software is aimed towards cake bakers who sell from home, and while I’m not a home bakery, I was really interested in learning what was I spending on chocolatiering and baking. The software does a lot, including:

  • ingredient pricing
  • recipe costing
  • inventory management
  • order management
  • vendor management
  • invoicing
  • mileage log

It costs $149 USD for year one, and then $20 per year afterwards. CakeCentral.com users get a 10% discount off the cost of year one. It supports many currencies, and metric and Imperial measurements.

I think the software is great and well worth the price. The developer is responsive to customer suggestions for additions to the software and while I haven’t used their customer service myself for support questions, they get a lot of positive feedback from the Cake Central crowd.

It did exactly what I wanted it to. I was able to get a much more accurate cost of what we were actually spending on the Christmas chocolates. I’ve been using this software to work out the price of all my baked goods too and that’s why on my blog posts after Christmas, the cost per serving has been much more accurate.

ganache cost

You can see from this screen shot that when I make milk chocolate peppermint ganache, the software calculates that the amount of chocolate I’m using costs $4, the amount of cream costs $1.52, and the flavour oil is 2 cents. Neat!

Each year, we make 540 chocolates, which is 60 chocolates of each flavour. Whew!

To produce 540 chocolates and their fillings, I’m going to use:

  • 2.77 kg milk chocolate
  • 2.52 kg semi-sweet chocolate
  • 1 kg white chocolate
  • 840 g dark chocolate
  • 840 g Toblerone chocolate
  • 1.4 L heavy cream
  • 200 g white sugar
  • 100 g almonds
  • 76 g unsalted butter
  • 6 g matcha powder
  • 1 g salt
  • 1 vanilla bean
  • 1 g buttercream flavouring oil
  • 1 g raspberry flavouring oil
  • 1 g orange cream flavouring oil
  • 1 g pepperment flavouring oil
  • 50 boxes and ribbons
  • 50 maps


Since I buy chocolate in 5 kg blocks, I already knew the total cost I was spending if I was completely out of ingredients, but CakeBoss breaks it down to what does 2.77 kg of milk chocolate cost me from the 5 kg block which I purchased. It’s a very useful tool.

If I ever make the move to selling at a farmer’s market or something, it’s good to know I already have a handle on what I’m spending on ingredients and supplies thanks to CakeBoss.

French Corner Bakery & Patisserie review

Yesterday was my first visit to French Corner Bakery & Patisserie. I am now planning many more visits.  ^^

20160324_154025

French Corner is located at 1224 Dundas Street West, Unit 114, Mississauga, ON, L5C 4G7.  They have an active Facebook page and you can see many delightful pictures of their wares from Yelp reviewers.

My friend and I ventured forth in the aftermath of a freezing rain to sample the goods.  She has been there many times and told me about how much the bakery has expanded since she started visiting.

Review:

Another pasty gem hiding in plain site, what is with these amazing French patisseries in unexpected neighbourhoods?

We visited around 3:30 pm on a Thursday afternoon.  There were a few other customers but it wasn’t packed (thank you weather!), which was nice. Both counter staff were friendly and helpful. The food we tried was very good, and reasonably priced.

The front area is a long rectangle, with a counter running lengthwise and a large display case. You can see into the back where the staff are at work creating their works of art which is neat.

Aside from pastries and baked goodies, they also offer fresh breads, soups and salads, hot drinks, lots of lovely things.  The only thing I found odd was that the pastry displays are not labelled, this for example is obviously a lemon tart, but some other items were not so obvious to me what they were called. It was fine however, the lady behind the counter patiently explained each item that I was interested in.

20160324_154020

I had the lemon tart and the night and day mouse.  The tart was wonderful, the lemon curd was tangy and light, in a nice firm crust.  The mousse was amazing, I will definitely try both of these items again!

My friend had pistachio mouse and a red raspberry item, which I forget the name.

20160324_154030

The cup of hot chocolate was perfect for a cold spring day.

20160324_154042

I’m looking forward to bringing Boyfriend Unit to this bakery with me next time.

Paradise redux at Tony’s Bistro & Pâtisserie

This summer past I ended up back home again for a little while, and you know what is just 30 minutes from back home?  Tony’s Bistro & Pâtisserie

For the uninitiated this gem is located at 137 McLaughlin Drive, Moncton, NB, E1A 4P4.

20150714_115913

A lot of people say you can’t recapture the past and trying to recreate a treasured memory will only serve to tarnish its glow.  In my personal experience however, that is not always true.  Some things remain spectacular.  Such is food at Tony’s.

It was precisely one year after my first visit to Tony’s that I got to make my second visit to Tony’s.  July 2015 will live forever as the summer I ate at Tony’s four times in one week.

20150715_110539

That may seem excessive, but I was determined to try the breakfast and lunch items, not just the desserts.  Do not fear, plenty of desserts were tried too.

20150715_110555

I’m pleased to report lunch was just as good as breakfast.

20150714_113436

For readers who enjoy factual reviews, I recommend Tony’s because:

  • delicious food with nice presentation
  • glorious desserts
  • nice ambiance
  • very reasonable pricing
  • pleasant and efficient staff
  • well-stocked, fresh pastry cabinet

20150714_115128

Everything I have tried so far (and I have tried a lot of the desserts so far!) has tasted as wonderful as it looks.  You don’t always find that in a pâtisserie.

20150714_115907

This summer I had the lemon flan, the chocolate royale, and the paradis.  Ah; the paradis. It is chocolate mousse, white chocolate mousse, and crème brûlée, and such an interesting presentation. Baking is my hobby, but it’s always been chocolatiering and fancy desserts that make my heart sing.

20150714_115935

It was the first time I have ever sat looking at a dessert for a few minutes, not wanting to ruin it with my spoon.  Then curiosity got the better of me.

20150714_120535

What I like so much about Tony’s is the variety and the artistry of each dessert.  The paradis was incredibly good.  Every layer was so complimentary to the whole, and it was just so delicious.

Leave a shout-out to your favourite restaurant in the comments. I’d like to hear who you recommend and why.


École Chocolat review

I’de been wanting to up my chocolatiering skills in preparation for Christmas 2015. I can usually learn a fair amount from reading and online tutorials, but lately it felt like I had hit a plateau.  When I heard about École chocolat I was immediately intrigued, but hesitant.

École chocolat is an online school based out of Vancouver, BC, founded in 2003 by Pam Williams, a master chocolatier who also founded the truffle business Au Chocolat in 1981.  Pam has authored two books on chocolate, Oh Truffles by Au Chocolat and Raising the Bar: the Future of Fine Chocolate.

Still, I couldn’t find any reviews or first hand accounts of École chocolat, and I was leary of spending a lot of money on an e-school that isn’t accredited. I hemmed and hawed for awhile, and decided to go for it. I’m glad I did.

École chocolat offers several courses:

  • Professional Chocolatier
  • Business Planning
  • Professional Chocolatier + Business Planning (cheaper than doing the two courses individually)
  • Chocolate Making from bean to bar
  • Quality Assurance for Chocolatiers
  • Master Chocolatier programs all over the globe
  • Chocolate Connoisseur courses

I took the Professional Chocolatier + Business Planning program. It’s a 4 month course, which you mostly do at your own pace but assignments have deadlines.  If you pass your assignments you receive your diploma.

How much did it cost?

  • Summer-fall 2015 tuition was $830 CAD + 13% HST = $937.90
  • School supplies cost $403.41 which includes taxes and shipping

Depending on what’s available to you locally you may be able to get the supplies for less.  I think the list was too much stuff, some of the items I still haven’t used, such as the chocolate chipper, acetate, and pastry brushes.

I’ve only used the cocoa butter and marble slab one time so far.  On the other hand, I probably would never have tried working with cocoa butter if they hadn’t said I needed it, and it’s a pretty cool product!  So I don’t regret buying any of the supplies, but they were were expensive and I am someone who already owned a lot of chocolatier supplies.

The school has a relationship with Chef Rubber who offers a starter kit for EC students containing some of the harder to source items. I was interested, but their shipping costs from US to Canada were over $100.  No thanks!

What was the course like?

Challenging.  Fun.  Interesting.  I learned so much.  The Master Chocolatier course has one instructor, the Business Plan portion has another.  Both instructors are fairly prompt at answering questions, and there is an active forum, one for students and one for grads.

I would recommend this course to anyone who has worked with chocolate and is interested in learning more techniques with some guidance. As long as you’re motivated to get work done, on time, you will be fine.

Recipe creation was a blast.  I had some home runs, like this blueberry crème brùlée milk chocolate, which my was introduction to using transfer sheets.  This is possibly one of the tastiest things I have ever thought of.

20151009_085458

And uh… I had some dismal failures.  Like nougat.  But it doesn’t matter if your attempt doesn’t work out, as long as you go through the process, take notes and learn, that’s all they’re looking for on most of them.  Some of my recipe creations were total disasters.

What did I learn?

Too much to quantify!  The course has a huge amount of downloadable reference material, and I’m still going through some of it. I think they really do cover pretty much everything.  Some highlights were the history of chocolate, production practices, flavours, design, decoration, business case studies, and how to contact wholesalers and find distributors in my area, which turned out to be a wonderful opportunity.  And they teach lots more.

The assignments were straightforward, and some of them really push you into experimenting with ideas you’d never try on your own.

The Business Plan part of the course wasn’t exactly what I expected.  It was good, don’t get me wrong.  I just had different expectations about what I would learn.  I still came away with knowledge I didn’t have before going in and that’s what counts.

I plan to sign up for EC’s Quality Assurance program in the future.  As a Professional program grad I get a discount on future courses. ^^

Was it worth it?

Yes. I graduated with honours, learned new skills and have a higher sense of accomplishment in my chocolate work.  My diploma hangs on the wall and makes me smile every time I see it.

It was expensive for an uncredited program.  I understand why it’s not accredited, because the students are all over the world, but as a Canadian I would have loved if it was accredited in Canada.

My Christmas chocolates this year were the best yet and I am much more confident after becoming an EC grad.

McCall’s puff pastry 1 review

Well it’s been awhile. I haven’t been able to bake much in about a year, because reasons, but something I’ve wanted to share is that for my birthday last month, Boyfriend Unit sent me to pastry school at McCall’s for a day! It was absolutely spectacular. I learned to make all sorts of treats.

20151003_172730

Cost: $160

Course length: 7 hours

What did we learn:

  • puff pastry
  • pastry cream
  • strudel
  • Mille-Feuille
  • turnovers
  • pastry cream
  • lots of small pastry and savory stuff too

Once again Kay was my instructor, she is a great teacher and very skilled. I recommend this course to anyone aspiring to learn more about pastry and has an interest in hands-on learning. One day I hope to make pastry as effortlessly as Kay makes it, one day… I made this!!!

20151003_172817

A nice feature of McCall’s courses is that the day of the class, you are given a 10% discount on in-store purchases, and a coupon for 10% off the next time you shop there. It’s fun to see the tools in person and figure out what I want vs. what I need to try things at home.

Everything was so delicious too. Puff pastry is a lot of work. It takes hours and requires a lot of folding the dough, letting it rest and chill, and rolling it out to fold again. It was actually pretty exhausting.

For a few years I’ve been reading about pricing in the baking industry; how people balk at the cost of large items like wedding cakes or mass amounts of pastry, but think nothing of going to a restaurant and paying $6 to $12 for one dessert. After these work shop I’m convinced pastry is under priced.  What you pay is not only priced to cover ingredient cost and overhead, it has to account for the skill of the baker and the time it takes to prepare baked goods. Someone is working that dough for hours and they have spent years honing their craft. If you are in a nice restaurant try their pastry! Most times it’s worth your while. 🙂

McCall’s Pure Chocolate Workshop review

20141017_153626

This week I attended the Pure Chocolate Workshop at McCall’s School of Cake Decoration with Boyfriend Unit. I was hoping to learn more about making good creamy fillings for my chocolates. I rank my knowledge level close to intermediate, I know how to temper by hand, I dabble in recipe crafting, but so far my creations lack a certain “oomph”. I was really excited to learn from a professional. And what I made after I got home, well… you’ll see.

Cost: $75 per person

Course length: 3 hours

What did we learn:

  • introduction to couverture chocolate and how to handle it
  • melting and tempering
  • working chocolate (tabling) on a marble slab
  • dipping chocolate
  • types of fillings and shelf life
  • storage and temperature
  • moulding and filling

If you’re in the GTA, McCall’s is on Bloor St West between Kipling and Islington, we walked up from Kipling Station. This course is offered once per season. I’ve never been to McCall’s before, and the inside is a lot bigger than you can tell from the street view. There is a retail shop in the front and a teaching kitchen in the back. It was filled with all sorts of glorious machines and tools that I wanted to cart home.

20141017_153506

Our instructor was Kay, who has 30+ years industry experience. She was very knowledgable, and funny. She spent some time talking about different brands of fine chocolate, the conching and tempering process. I have tempered on stove top via double boiler, and in the microwave, and with a professional tempering machine. I have never tabled chocolate on a marble slab before and that is the method we learned.

20141017_153358

^ the box of everything we made in the course

I’m glad I got to try tabling chocolate, but never again! We screwed up the milk chocolate twice before she intervened. How embarrassing. We got to work with polycarbonate moulds, and learned some different techniques to get pretty designs on the chocolate.

I learned a lot, and had a great time. I’d recommend this course to anybody who wants to learn more about working with chocolate.

What I made when I got home:

When she showed us how to coat a mould, everybody said “Ooooh” at the same time, and I decided to try it out on my silicone moulds.

After you temper some chocolate, pour it into your mould until it overflows. Don’t worry about being neat or even. Now whack it on the counter to remove air bubbles and ensure the entire cavity is filled.

You turn it upside down so all the chocolate drips out onto the parchment paper (see top right) and use a palette scrape to pull the excess away.Turn it and shake it a bit to get an even coating, and don’t throw the excess away, once it sets, it is easily peeled off the parchment paper and you save it to re-temper.) You end up with moulds coated in chocolate with hollow centres.

20141017_210503

This will set in under 20 minutes, and then IT IS TIME.
Pipe in the homemade caramel sauce!

20141017_220713(1)

Tap to settle it, and top up with more tempered chocolate. Again scrape away the excess.

And in about half an hour, you have this!

20141017_225832

Tah-dah!

20141017_232049

I mean, just look at it!

20141017_232053

Glorious! This is so much better than the hard caramels I’ve made before. I am so excited to send this to my family in December.

Dessert at Tony’s Bistro & Pâtisserie

Finally! I have been to Tony’s Bistro & Pâtisserie, and it’s totally worth a flight to Moncton. My sister has been raving about it for months. After sampling the goods I completely understand. Let this sink in for a minute.

20140723_185316

Tony’s is located at 137 McLaughlin Drive, Moncton, NB, E1A 4P4. It opened in 2013 and the owner/chef is Tony Holden, who has cooked for Queen Elizabeth II and Emperor Akihito. He has almost 30 years of experience and trained under French pastry chefs. Tony’s is a licensed bistro, with a varied menu, and a pastry display cabinet that will halt you in your tracks.

20140723_184746

We had just eaten dinner with my family, so we ordered dessert; carrot cake, raspberry cheesecake, crème brûlée, chocolate mousse, lemon tart, and coffee. Yes I know. Totally sinful. It all looked so good and I couldn’t decide on just one thing.

20140723_185230

What was it like? Firstly, the presentation was gorgeous. Someone takes pride in their work.

20140723_185412

And everything was delicious. The mousse (paradise in a cup) was so creamy!  The meringue is covering the lemon tart, which was exquisite. And the crème brûlée was impressive!

20140723_190014

How do they get the sugar to glass like that? When I make it, my sugar topping does not look like that! It was like stained glass and you could hear the snap when you broke it with the spoon. I was intrigued to see a tray of the custards in the display fridge, as every recipe I’ve read for this dessert says don’t caramelize the sugar ahead of time or it will sink into the custard. Clearly there is a way to make this work! I must learn this.

20140723_185323

The carrot cake and the cheesecake were both excellent as well. Oh, yum, so glad we went!

Review:

From the street, you really cannot tell what’s inside. I grew up 30 minutes from Moncton and Tony’s is not located in a neighbourhood that screams “delicious high-end food here”. The decor inside was pretty and spacious and bright. It’s a nice shock to find a place like Tony’s in that part of Moncton.

We visited around 6:30pm on a Wednesday. The server was pleasant and efficient.

I was pleasantly surprised to see the variety and quantity of desserts in the pastry cabinet. Some restaurants are pretty bare at that time of day, so it was really nice to see such a gorgeous display, and to get to try whatever I wanted.

The food was sublime, and reasonably priced.

I’ve decided on two new personal goals for myself. The first is that I shall visit Tony’s more often when I am in the area, just once was not enough! The second is that I shall become a person of international acclaim so perhaps Tony will cook for me. God, can you imagine?

Step up your chocolatiering

IMG_3124

So, what is it?  This is a chocolate tempering machine by ChocoVision. Tempering is the finicky process of heating and cooling chocolate to specific degrees to get a glossy product that keeps its shape at room temperature and has a lovely snap.

I really love making homemade chocolates and I make a lot, which takes about 3 days to temper all the chocolate I need. This machine is going to speed up production and ensure results consistency. Or so I hope. Will review it in full after use. Its maiden voyage is tomorrow and I quiver with anticipation.

KitchenAid mixer review

“Thou shall not covet thy sister’s appliance.”

I chanted those words to myself the first time I saw M’s glorious new acquisition. I am not often struck with home appliance lust, but there was something compelling about the mixer. I was so determined to own a KitchenAid that I started buying attachments before I got the mixer.

Their mixers are so shiny. And powerful. And expensive. They have a smooth, rounded design, high gloss finish, plenty of chrome, and a hint of retro. But are they worth the hype?

closeau

Functionality: There are two main types of KA mixers: tilt-head which have a smaller bowl and lots of colour choices, or the lift-bowls which have bigger bowl capacity but limited colour selection. For the hobby baker, the smaller tilt-head is a good choice.

Price: The mixers and accessories get marked down a lot the week after Christmas and Mother’s Day. If you are patient, you can get the one you want for a very good price.

Be aware the prices change a lot. You’ll see a huge variance in pricing (over $200) on the websites for Amazon.ca, Canadian Tire, Future Shop, and Wal-mart. My advice is figure out which model you want first, understand the specialty colours have a price mark-up, and when the one you want goes on sale, go for it!

IMG_9486

This is a KitchenAid Artisan 10-Speed 325 Watt Stand Mixer (model # KSM150PSBU) in cobalt blue.

I purchased my precious on May 4, 2011 from FutureShop.ca for $219.99 and the shipping was free. The after-tax total was $248.59 CAD. It came with a stainless steel bowl (no spout), and four attachments: flat beater, wire whip, pouring shield, and dough hook. For comparison the same model is currently selling for $500 before tax, so the sale price makes quite a difference!

Specs: The details below are from the Canadian KA website and the information is current as of today’s date. Most of the attachments are compatible with all mixer models but do your own research, there are some negative reviews online about people in Europe buying incompatible parts from the North American distributors.

Tilt-head mixers:
Architect series, 5-qt (4.73 L), 5 colours
Artisan series 5-qt (4.73 L), 25 colours
Classic series, 4.5-qt (4.26 L), 2 colours
Ultra Power Plus, 4.5-qt (4.26 L), 3 colours

Bowl-lift mixers:
Professional 600 series, 6-qt (5.68 L), 4 colours
Professional 7-qt (6.6 L), 1 colour

Colour: Obviously the Artisan has the most colour selection. Buying a stand mixer is like buying a car, you can research all you want online but you won’t get a real sense of the colour until you see it in person. Personally I think the cobalt blue is more of a deep rich violet blue, but I love it anyway.

Attachment and accessories: I have the ice cream maker attachment (part # KICA0WH) which I received in Oct 2012 as a gift. It comes with four pieces: freeze bowl, dasher, adapter ring, and drive assembly. It is pretty awesome, and I recommend it.

IMG_1348

I misunderstood the instructions, which indicate that some (not all) tilt-head mixers require the adapter ring to make the bowl fit into the mixer. Mine does not require the ring.

I have a spare mixing bowl so I can make batter and icing without stopping to clean the bowl. I purchased the 5 quart glass bowl with lid (model # K5GB) before I purchased the mixer actually… I found it for $20 at an in-store sale at a Future Shop in Toronto. I’ve noticed that Wal-mart sells the same bowl for $80 but they reduce it to $20 around Christmas.

IMG_0794

I chilled it here to make whipped cream. This is definitely worth waiting for the sale. It’s also a lot wider than the stainless steel bowl that comes with the Artisan, so it’s easier to pour into while the mixer is running.

Buyer beware: As with any mass-produced product, there are lemons and angry buyers. I would definitely recommend you research product reviews before you buy.

A common complaint about KA mixers is that after a time, black grease drips down into the bowl. This is food-grade oil used to lubricate the motor, and KA recommends you run the mixer regularly to prevent this drip down.

You will need to adjust the beater height and tighten the attachment bolt periodically.

When mine was brand new, I’d notice some purple dye would come off when I wiped it down. This has not led to any discolouration however.

You may need to adjust the mixing time on some recipes because the KA mixer goes fast, so flour-heavy mixtures may become over beaten until you get used to the high speed. My first attempt to make whipped cream was a disaster.

Was it worth it? I think so.

I use my KitchenAid mixer in almost everything I bake. Before I got one, I used a little plastic stand mixer which bounced across the counter as it ran, unless I stood there to hold it in place. I don’t have that problem anymore, the KA mixer is solid, so I can start it and walk away to work on something else. I’ve had it for 22 months and so far everything has run smoothly.

I’m not going to lie, what initially attracted me was THE SHINY and the beautiful colours. It is my trusty tool to make lots of delicious goodies. I’m glad I bought it.

I asked Boyfriend Unit to provide his unbiased opinion, “Was Nemo a good purchase?”

His response? “I can’t provide an unbiased opinion. Since you bought it, I get to eat so many good things.”