“If you want to conquer the world, you best have dragons.”

These didn’t come out quite as intended but they were delicious any way. I wanted to make Mini Egg cookies for Easter, and a test run was needed. (I was surprised how easily Boyfriend Unit accepted this flimsy excuse as justification to add a jumbo bag of Mini Eggs to the grocery list, but there you have it.) On a whim I dyed them green because I thought they would look cuter, like dino eggs in grass.

20140323_225438

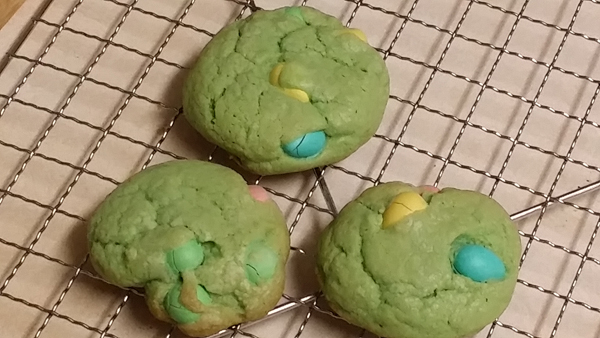
Except now that I’m more awake, I remember that dinosaurs roamed before grass covered the ground, which I learned from the making-of features in Walking with Dinosaurs. Whatever. The grass effect is artistic. Moving right along.

20140323_175436

Time required: 1 hour

Yields: 24?

Total cost if you have none of the ingredients: $40

Cost per cookie: $1.70
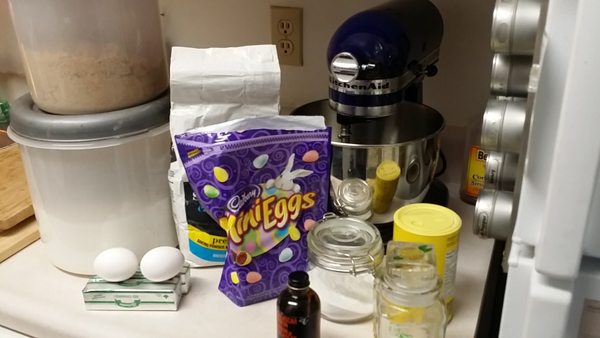
Ingredients:

  • 1 C butter, softened
  • 1 C brown sugar, packed
  • ½ C white sugar
  • 2 eggs
  • 1 TBSP vanilla
  • 2 C white flour + 1 C cake flour
  • ½ tsp baking powder
  • ½ tsp baking soda
  • ¼ tsp salt
  • drop of kelly green fondant colouring
  • 1 C of Mini Eggs (do not use “Eggies” they are not the same)

Instructions:

1. Pre-heat to 176° C / 350°F.

2. Beat the butter until it’s fluffy. When Boyfriend Unit comes to photograph for me I will always give a thumbs up. Cause I am a very cheesy person.

20140323_181243

3. Before you add the eggs, beat them (one at a time) in a small cup, then pour in, and blend. Hmm. Something’s not right here. Attempt to cream the sugar now and fail miserable.

20140323_181347

Cheer on glorious mixer, spin like a hurricane! (Yes, I really talk to my appliance, in exactly that tone.)

20140323_181323

4. Hmmm, actually it seems salvageable now. Meanwhile…

20140323_181717

… combine the dry ingredients (both flours, baking soda, baking power, salt), give it a stir, and then add it to the wet in thirds.

20140323_182433

Struggle to mix it. Nemo started to make a chugging sound, this dough was very thick.

20140323_182709

5. Almost add the eggs. Change your mind.

20140323_182358

Add fondant colouring instead.

20140323_183148

6. Introduce your dragons! Giggle like a fool.

20140323_183224

7. Bake 12-15 min, checked at 10 but too jiggly, gave them another 2-3 min. Cool on rack a few min and consume hot.

20140323_225302

Verdict:

Hmm. These are pretty good! And fun to make. I wasn’t sure how a Mini Egg would hold up to being baked in the oven, they still had the snap when you bit into them although the shells cracked in the oven.

“He was no dragon. Fire cannot kill a dragon.”

I intended to cream the sugar into the butter before adding the eggs but I forgot. I’m not sure yet how these feel or taste after cooling, I only made 4 to test them.

I added cake flour to regular flour because I’ve had cake flour sitting around forever not doing anything with it and was curious how it would affect texture. It gave the cookies a nice consistency. I think I will tinker a bit and add some more flavouring, maybe cardamom. Something spicy for dragon eggs. A cookie fit for a khaleesi.

Playlist: Lit – My Own Worst Enemy

Advertisement

Ninjabread men

IMG_1781

CHUCK NORRIS! These ninjas are cut out for action!

My friend M (actually I have two friends named M, but this one is the boy) gave me a very cool gift last year and I have been waiting for December to use it. It’s a set of 3 ninja cookie cutters. M has a penchant for gifting me with ninja-related presents and the cookie cutters were just SO AWESOME.

IMG_1763

Ingredients:

  •  ⅔ C shortening
  • ½ C brown sugar, packed
  • 2 TSP ginger, ground
  • 1 TSP cinnamon
  • ¼ TSP cloves, ground
  • pinch of salt
  • 1 egg
  • ¾ C molasses
  • 3 C flour
  • 1 TSP baking soda
  • ½ TSP baking powder

Instructions:

1. Moving like the wind, pre-heat your oven to 190°C / 375°F.

2. Quietly cream together the shortening, sugar, spices, and salt.

3. Beat in egg, to death. Add molasses and blend into the night.

IMG_1765

4. Sift together flour, baking soda, and baking powder. Add dry mixture to the wet with deadly accuracy. Cream together as if your life depends on it.

IMG_1766

5. Roll the dough to ⅛ thickness, as even and smooth as the deadliest katana. Your hands move like a whisper, cutting the dark shapes into the dough.

IMG_1769

6. Release the ninjas. Transfer them to a baking sheet that has been greased with lightning or lined with parchment paper.

IMG_1770

7. Bake 6-7 min. Cool on rack. (Here is Boyfriend taking them out of the oven for me.)

IMG_1773

Oh noes! The ninjas are burnt. Let’s try another round.

IMG_1771

8. Frost with traditional ninja accessories. (I used my basic butter cream and divided the bowl of frosting in thirds. One part I left plain, and the other two I added highly concentrated no-taste black and no-taste red pigment. To achieve a darker black, I added cocoa to that bowl because it’s a lot easier to get black frosting if you start with chocolate frosting.)

IMG_1776

I didn’t use the red dye yet, I’m going to let it sit overnight to darken. Stay tuned for more ninjas later this weekend.

IMG_1781

Go ninja go!

IMG_1776

Verdict:

Making these was a lot of fun. The first few ninjabread that I rolled did not turn out so well. As I was transferring them to the cookie sheet, I squished them. They ended up misshapen and burnt.

For the second batch I got Boyfriend Unit to hold a piece of parchment paper tightly against the cookie pan, and I  plopped the dough right on to that, and rolled it out, cut the shapes, and then just peeled the excess away so the ninjas did not have to be moved. It worked much better.

The ninjas tasted pretty nice. I’ve never made gingerbreads before, they are tricky to work with. I have new respect for my sister J’s skills.

Playlist: Placebo – Running Up That Hill

Cola molasses cookies

It’s only my favourite thing in the world.


I love Coke. I like the way the curved glass bottle fits my hand, I like how frost rimes the neck of the bottle, and my ears perk up when I hear a bottle being opened. I love how Coke tastes, and the way it fizzes going down. I also love molasses cookies and wondered if the two flavours were complimentary. I’ve wanted to try this for awhile.

Efforts to secure Coca-Cola extract failed, so I ordered some of LorAnn’s Cola flavouring and added it to molasses cookies. Afraid to use too much extract, I added 5 drops to a basic molasses recipe, and voila.

So how did it taste?


It was weird. You could smell the cola, but when you bit into the cookie, it was very faint. It almost tasted like the cookies had cola hot spots, some bites had a wallop of flavour, and some you couldn’t taste it at all. (Perhaps I under-mixed the batter?)

I wasn’t overly sold on the cookie recipe I started with, so I’m going to tinker around with it.


Patty’s ultimate peanut butter cookies

It’s round 2 of Patty vs. Peanut Butter. Are these the cookies I’ve been waiting for? Stay tuned and find out.

I adapted this recipe from the Good Housekeeping Cookies! book, which is available on Amazon.com and Amazon.ca if you’re interested.

Time required: 1 hr

Yields: 2 dozen or so

Total cost if you have none of the ingredients: $54

Cost per cookie: $2.25

Kitchen implements I used:

  • KitchenAid mixer
  • cookie trays

Ingredients:

  • 2¾ C flour
  • 1 TSP baking powder
  • ½ TSP baking soda
  • ¼ TSP salt
  • 1 C butter, softened
  • 1 C creamy peanut butter
  • 1 C brown sugar, packed
  • ½ C granulated white sugar
  • 2 TBSP corn syrup
  • 2 TSP vanilla
  • 2 eggs
  • ½ C Chipits Reese’s peanut butter chips
  • ½ C Chipits milk chocolate chips
  • ½ C Chipits Skor toffee chips

Instructions:

1. Pre-heat oven to 190°C / 375°F.

2. In medium bowl combine flour, baking powder, baking soda, and salt. Set aside.

3. In mixer cream together butter, white sugar, brown sugar, and peanut butter (it’s a lot easier to get the peanut butter out if you lightly grease the cup first). Beat until fluffy.

4. Beat in eggs, vanilla, and corn syrup. I always mix all the wet stuff together then pour into the dough because I am lazy.

5. On low speed, add the dry mixture by thirds, beat until just combined.

6. Mix in the chips, then cover and chill dough for 30 min.

This is some seriously heavy dough.

7. Roll dough into balls and bake for 12 min. Do that fork thing if you want.

8. Cool in pan 1 min, then transfer to wire rack.

9. Pour some milk and enjoy!

Verdict: Tonight we have company, a friend who is a self-proclaimed cookie connoisseur. He tasted one of these, and decided, “It’s actually pretty much perfect.”

I really enjoyed these.

Playlist: The Legend of Zelda symphony

Peanut butter cookies

Sometimes you find the tastiest recipes off packages in the baking aisle. These cookies were made from the directions on a bag of Hershey’s Chipits Reese peanut butter chips.

I’m enjoying a rare Saturday off and am having a lazy day. So lazy in fact, I was careless with dropping the dough on the tray and ended up with very flat cookies. Behold, peanut butter cookies made without peanut butter!

Time required: 1 hour

Yields: about 4 dozen small cookies

Total cost if you have none of the ingredients: $30

Cost per cookie: $0.63

Kitchen implements I used:

  • KitchenAid mixer
  • cookie tray

Ingredients:

  • 1 C butter, softened
  • 1 C golden brown sugar
  • ½ C granulated white sugar
  • 2 eggs
  • 1½ TSP vanilla
  • 2 C flour
  • 1 TSP baking soda
  • ½ TSP salt
  • 300g package of Reese peanut butter chipits

1. Pre-heat oven to 190 °C / 375°F.

2. In mixer cream butter, brown sugar, and white sugar.

3. Beat in eggs and vanilla.

4. In a bowl combine flour, baking soda, and salt. Gradually add to wet mixture.

5. Add peanut butter chips, and drop onto cookie tray.

6. Bake around 10 minutes.

7. Cool cookies on pan (on a wire rack) for 2 min, before transferring cookies directly to wire rack.

Verdict: Not bad, but not the best peanut butter cookie I’ve eaten.

Playlist: howling cat

Cookieducken

Cookie! Cookie! baking hot
In the oven of my lot
With spatula in hand do I
Dare craft thy fearful deliciousness

My sister sent me a link called “love in pan”; a triple-threat of chocolate chip cookie dough, Reese’s peanut butter cups, and brownies. I am fundamentally opposed to using pre-made cookie dough but making everything from scratch would sort of the defeat the purpose of this near-instant cookie-thing, so I gave it a whirl.

Everybody in the grocery store was judging me as I filled my basket. It was awful.

Instructions:

1. Pre-heat oven to 176°C / 350°F.

2. Make brownie batter and set aside.

3. Slice chilled cookie dough and place into muffin tin (or if you’re like me and don’t own a muffin tin, use a cupcake tin).

4. Add the peanut butter cups upsidedown.

5. Cover with brownie batter.

6. Bake at least 18 min. (Mine were still raw at 18, baked another 5, then cooled 5 min in pan.)

Yikes. Are they supposed to look like inverted mushrooms? I pried them out of the pan and ate one.

Verdict: They were good, but eating more than one is probably hazardous to one’s health. I think you are supposed to either use a bigger pan, or less dough and batter.  Boyfriend assures me they are delicious. These were gigantic.

Playlist: 80’s


Milk chocolate Florentine cookies

I have no idea what a Florentine cookie is but I’m going to make them because I’m hardcore like that. Actually one reason I like making recipes I’ve never tried is there is no preconception of how the item should taste. I find that competing with nostalgia is often a quick road to disappointment.

Since I don’t know what to expect I’m going to treat this like a scientific experiment. I will need to:

  • ask a question
  • do background research
  • construct a hypothesis
  • test my hypothesis by running an experiment
  • analyze data and draw a conclusion
  • communicate your results

Notes related to the experiment will be written in red, like so.

Ask a question: what is a Florentine?

Do background research: I used my Google-Fu but was not enlightened. I have deduced that a Florentine is a flat, “Old World favourite”, sometimes made with cheap ingredients and sometimes jazzed up with lots of funky stuff, but mainly a sandwich-style cookie with a layer of something between the cookies. But that leaves a lot of room for interpretation. I remain confused.

Construct a hypothesis: If I follow the recipe in Chocolate 3 books in 1 by Nestlé, which is available on Amazon.com, I will make Florentine cookies, and I will know what they are.

(Mini book review: hard cover, sturdy ring binding, some good recipe ideas, lots of pictures, the majority of the recipes are contained on one page each which is always a plus. It contains contains Holiday ClassicsVery Best Baking, and Family Favorites. Cannot locate on on Amazon.ca)

Time required: 1 hr

Yields: supposedly 42 cookies

Cost per cookie: $1.24

Total cost if you have none of the ingredients: $34.00

Kitchen implements I used:

  • large cookie tray
  • tinfoil

Ingredients:

  •  ⅔ C butter, melted (10.6 TBSP)
  • 2 C quick oats
  • 1 C granulated white sugar
  • ⅔ C flour
  • ¼ C corn syrup
  • ½ C milk
  • 1 TSP vanilla extract
  • ¼ TSP salt
  • 1¾ C milk chocolate chips, melted

Test my hypothesis by doing an experiment:

1. Pre-heat oven to 190.5°C / 375°F. Line baking tray with tin foil.

2. Measure out and set aside:

  • wet mixture: milk, corn syrup, vanilla
  • dry mixture: combine in a medium bowl: oats, flour, sugar, and salt
  • chocolate chips (in a small microwave-safe bowl)

In retrospect I would have put the milk and corn syrup into one liquid measuring cup.

3. Melt butter in large pan and remove from heat.

(The vanilla was added here. I was not very efficient in making these.)

4. Stir wet mixture and dry mixture into the butter.

5. Drop cookies by using a level teaspoon onto foil, about 3 inches apart, and spread flat with a spatula.

Poor experiment control # 1: accidentally used tablespoon instead of teaspoon. Big cookies.

Hmm. Lots of goop. Not liking this so far.

6. Bake 6-8 minutes or until golden brown. I expected flat cookies since there is no leavening agent but I didn’t expect them to spread out into Mega-Cookie.

Perhaps it would have been smarter using a maximum of 2 cookies per row, teaspoon sized.

7. Cool cookies completely in pan on wire rack. Once cooled, remove from foil and flip upside down.

Poor experiment control # 2: a lot harder said than done, used a butter knife to pry them apart. Much cursing and shouting.

8. Melt chocolate chips by microwaving on High for 1 min or so, stirring until smooth.  Spread melted chocolate over half of the cookies (on the flat sides), then top with the remaining half of the cookies.

Poor experiment control # 3: didn’t want to eat a lot of cookies so returned most of the chocolate chips back in the container, and melted about ¼C. Am unable to comment on how these cookies taste the next day after the chocolate has set. This is bad science!!

Analyze your data and draw conclusions: I didn’t like these at all. They were very greasy, and the taste was nothing special. I used cheap vanilla extract but doubt my premium vanilla would have saved them.

I suspect Boyfriend didn’t like them either. He didn’t say, but normally he’s falling over himself to eat my cookies (naughty!), but not this time.

I made these because I’ve had a bottle of corn syrup for a year and done nothing with it, and I wanted to get rid of some ingredients in the pantry before Boyfriend has an apoplexy every time he opens it. “It’s bursting with stuff Patty, why do you need so much stuff??”

I’m looking forward to trying other recipes from this book though.

Conjecture:

  1. Is this really an “Old World favourite”? I am thinking no, not if it’s made like this.
  2. Suspect this recipe is loosely based off the idea of a traditional Florentine, whatever that is, but Americanized to utilize cheap ingredients and make it easier to produce. Hard to  imagine traditional Florentines contain corn syrup and quick oats.
  3. Suspect cookies from the Old World, like their architecture, is superior to modern ones. Suspect a traditional Florentine is probably delicious and nothing at all like this recipe.

Playlist: Ayashi no Ceres – OST

Communicate your results: and… publish!

Have you ever been disappointed by a new recipe?