“The charm of homemade chocolates!”

That phrase is code for “something went wrong”.

IMG_3172

The first time I poured chocolate into molds, they had lots of air bubbles. I complained to my sister who wisely explained it’s like Ed Norton’s glassware in Fight Club, the little imperfections show it was hand-crafted and it’s just the charm of homemade chocolates. So now every time something untoward happens while I’m chocolatiering, you will hear an indignant curse from me, followed by a soothing assurance from Boyfriend Unit, “It’s the charm of homemade chocolates, don’t worry.”

And what goes wrong when you are making chocolates, pray tell? Air bubbles, cracks, bloom (cloudy spots), smudges, melting, seizing, fillings not centered, fillings exploded,  misprint on map, et cet. But I no longer care. Because I know, when people open the box…

IMG_3177

… and eat one, they are all “OMFG”. And that makes me smile.

IMG_3171

We make a 9 piece box, with one dark chocolate, three milk chocolates, and five semi-sweet chocolates. This year Boyfriend Unit experimented with a sea salt dark chocolate since he hates raspberry cream. He really liked the result.

Using a full-sized block of chocolate was a new experience. This is a 5 kilo or 11 pound block of Barry Callebaut Belgian chocolate, classified as a well-balanced bitter cocoa taste, 53.8% cocoa solids. This is the base of all my semi-sweet chocolates.

IMG_3150

I was so excited to open this!

IMG_3154

Just look at that! That is a lot of chocolate.

IMG_3157

My mother asked recently about my weekend plans.

“Making chocolate.”

“Oh hunni? Could you maybe send less dark chocolate this year?”

“Mom, there is one dark chocolate per box!”

“Oh hunni, that’s too much! I don’t like dark chocolate.”

“Ok Mom. No dark chocolate in yours.”

Stay tuned for how this was made and where to get supplies.

Born to dye

Experiments with natural dyes have run amok. Using spinach, turmeric, and beets, I was able to produce pots of bright dye, but adding them to the fillings did not accomplish much.

IMG_3143

Have you ever had an idea that seemed really great in your head? When I was little, I decided I would carve a wooden deer for my dad on Father’s Day. I had no source of income, ergo my consumer purchasing power was nil. So I decided to carve! Mind you I had no experience with carving, but I did have a stack of firewood and Dad’s set of carving tools. Several hours later, I had a mangled piece of wood and some splinters for my pain, no deer; that’s what homemade dye brings to mind.

The concept of dying my chocolate fillings seemed solid.  Making a pot of dye is fairly simple, simmer about 4 cups of water with ½ C of puréed vegetable or spice, and voila! But after the dye is made, adding it to the filling did not change the colour. Oh, woe.

Notes from the drawing board:

This base yields enough filling for 30 centres x 4 flavours, 120 pieces total.

Combine: 2 C icing sugar, 1½ TBSP unsalted butter, ¼ tsp vanilla, 2 TBSP evaporated milk.  Divide into 4 bowls.

Add flavouring oils to 3 bowls (none for the butter creams)

Peppermint oil = extremely potent, no more than 3 small drops. Several drops of spinach dye, no discernible difference. Cannot taste spinach.

Raspberry cream oil = very potent, 3 small drops quite strong also.  Adding 8 drops of beat juice sweetened it, yields soft pink colour.

Orange cream oil = weak, lost count after 30 drops, flavour is mild and weak bouquet, wtf. Several drops of turmeric dye, no change. Cannot taste spice.

mario

I like the idea of dying my chocolate fillings for two reasons:

  1. I am a 2-bite chocolate person. I like to look at the centre before it’s gone, so I want to see a pink raspberry cream or an orange filling
  2. It’s difficult to keep 4 bowls of fillings straight, after awhile your sense of smell and taste goes numb and you sit there, “Is this the orange cream or the butter cream??” The different colours would make it easy.

I don’t want to give up and use artificial dye. After all, my chocolate packaging hails them as containing “dairy, nuts, and all-natural vegetable dyes”. It’s either figure it out or give up on dye. It tooks days to get the letter spacing just so, no way in hell am I redrawing the chocolate map.

Boyfriend asked me, “Why do you want to dye peppermint patties green anyway? Aren’t they white??”

I think it was that I wanted 4 distinct colours since we had 4 flavoured cream fillings, and I thought peppermint leaves are green, raspberries are pink, butter is yellow, and orange is orange.

My problem is I don’t experiment before I need the dye, I just assume I will do XZY on Chocolate Shoppe Day and it will work. Clearly I need to try substituting more of the evaporated milk with the dye to balance out the liquid, and add enough to see the colour, yet not taste the base of the dye, perhaps more icing sugar to stiffen it up.

Playlist: Halo 2 – Mjölnir Mix

Milk chocolates – all done


What was it like to use a professional chocolate tempering machine? Fabulous. Amazing. Spectacular. Am running out of adjectives. It works so well and it’s so fast. (Product review will be posted after Christmas.)

IMG_3137

So basically my our tempering machine works even better than I had imagined.  Yesterday Boyfriend and I made 66 solid milk chocolates (above), and 51 toasted almond milk chocolates (below). Look at that beautiful gloss!

IMG_3136

Today we are going to make the Toberlone pieces, and then the milk chocolate is all done, next weekend is for the more labour-intensive filled chocolates. And the peppermint bark. Huzzah!

IMG-20131207-01301

“Why do you have to name it?!?”

“I just do. And its name is Bernard. Deal with it.”

This is what 5 kilos of chocolate looks like

See the piece of baker’s chocolate to show scale.

IMG_3117

And this is what 10 kilos looks like (22.04 lbs)!

IMG_3119

We are getting close to The Weekend of Trials & Tribulations in my house, otherwise known as CHOCOLATE FUN TIME.

Christmas chocolates ver 2.0


‘Twas the night before Christmas, and up in the city,
We made lots of chocolate, but not in a jiffy
The boxes were packed and sent on the train,
In hopes that my peeps would enjoy them again.

IMG_1752

What is better than chocolate? If you guessed “not very much” you would be right, and if you guessed “homemade chocolates” you’re be righter. More right? Whatever.

I have just finished eating a chocolate, which we made last week as Christmas gifts for family and friends. Last year we had lots of pretty boxes. I sort of forgot to order more boxes and we ran out this time. Luckily Boyfriend channeled MacGyver and made me some DIY boxes.

IMG_1746

I was really excited to make chocolates again this year because we got all the extra chocolate moulds I wanted, and had two of each shape, which makes it a lot easier to do.  Here is the map.

map-revised

Tried two new flavours this year: milk chocolate and toasted almond, and semi-sweet chocolate caramel chews. Said bye-bye to the dulche de leche and chocolate ganache.

I am so over the idea of Toblerone ganache. It never works out. “Toblerone goo” would be more apt. Never again! I’m just melting solid Toblerone bars from now on.

IMG_1751

I really love making chocolates. Just looking at them fills me with joy. I have a few more boxes to give to some friends. 😉

IMG_1747

I also made my peppermint bark. Le yum.

IMG_0170

What type of chocolate is your favourite?


Christmas chocolate boxes

This year Boyfriend and I made boxes of chocolate as Christmas presents, to go along with the tins of peppermint bark. This idea had been percolating for a few months. After the first batch of chocolates turned out so well, I asked Boyfriend if he wanted join me in making chocolates together. He thought this was a good plan, so we spent a few evenings drinking cocoa and playing video games as we worked out the details.

There were three problems with this plan:

  1. How do you make fillings for chocolates that won’t spoil? Mousse was out.
  2. How do you make coloured fillings when somebody has an anaphylaxis reaction to food colouring?
  3. Would the chocolates survive being transported from Toronto to the east coast on the VIA train?

First, we did some stealth research on family preferences, and started brainstorming what flavours to make, and how to make them. Neither of us had made chocolate fillings before, but how hard could it be? We decided that Boyfriend would make the fillings and I would temper the chocolate, and by the magic of team work, they would come together into one glorious confection. Oh, hubris.

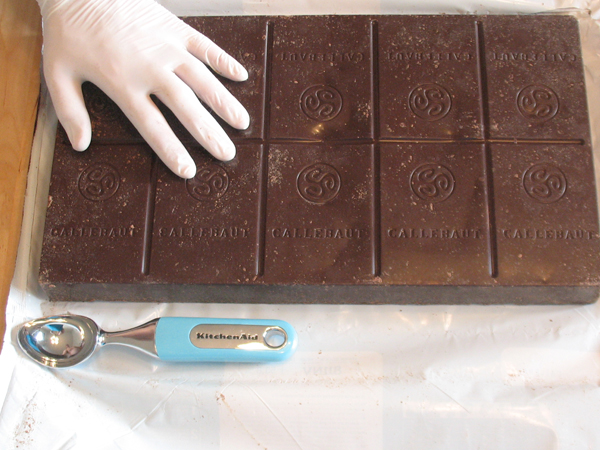
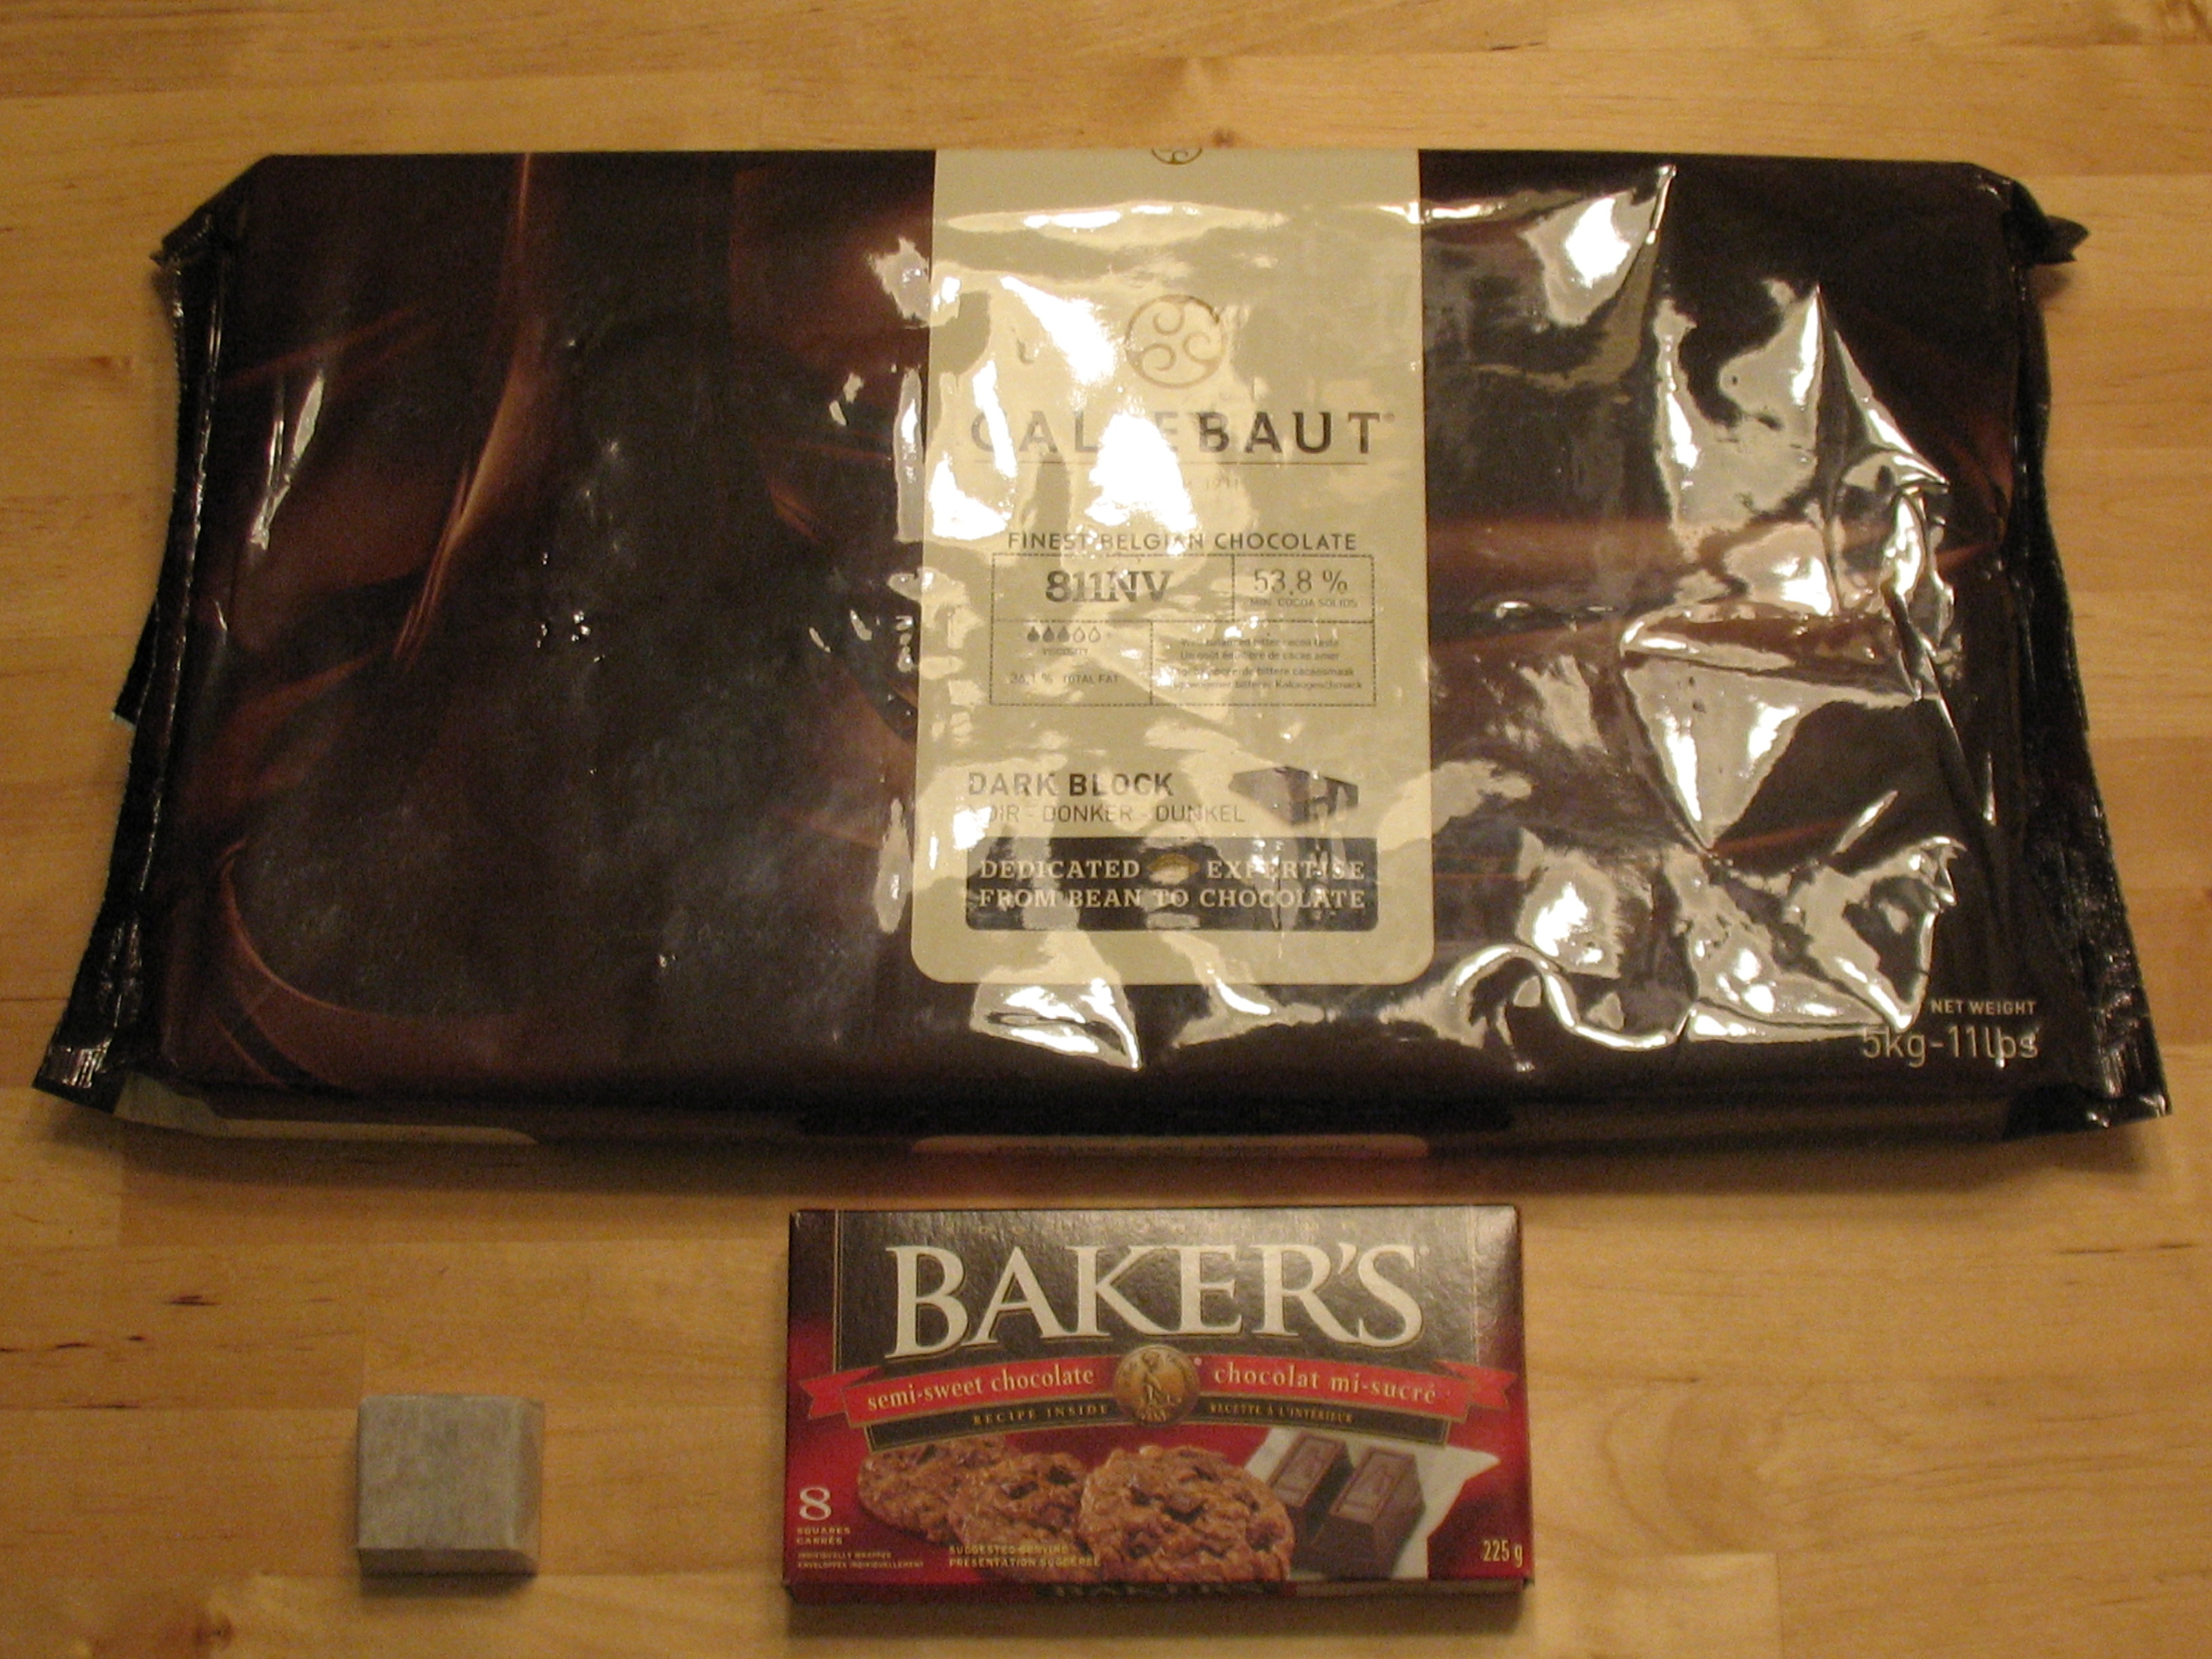
Second, we ordered supplies: silicon moulds, flavouring oils, boxes, ribbon, and photo-quality paper. After coming up with a rough estimate of how much chocolate was required, I hit up the farmer’s market and purchased seven kilograms of Belgian chocolate; milk, dark, semi-sweet, and white.

Third, after the boxes arrived, they had to be assembled. This was a lot harder than it sounds. Boyfriend saved the day since I had no idea what to do. Once the boxes were ready, I designed a label and he affixed it to the box.

Fourth, we made a map! We had 6 different mould shapes, but each box was meant to hold 9 chocolates, so there would be some repeats. The map went under multiple revisions before I settled on this:

Fifth, practice run! Filling chocolates was brand-new territory, I wanted to experiment to get the technique down. I tempered a batch of chocolate and we got to work.

To make the fillings, Boyfriend mixed up icing sugar, butter, and evaporated milk in Nemo the KitchenAid, and then divided into 4 bowls, which he flavoured accordingly with: orange cream, peppermint, and raspberry. To get the buttercream, he kept one bowl aside without any extra flavouring ingredients.

The peanut butter filling was chilled, rolled into balls, then placed in the freezer.

Boyfriend making peanut butter balls

For the other filled ones, I made a simple ganache, by pouring scalded cream over milk chocolate, and over Toblerone pieces.

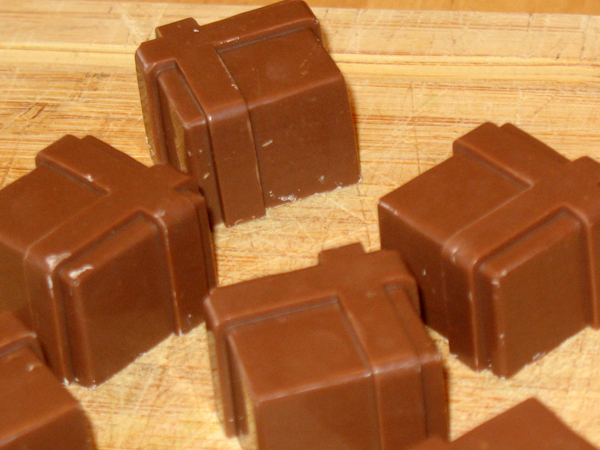
Once the chocolate was tempered, I poured a little chocolate into the bottom of the moulds, he put the filling in, and I topped it up with more chocolate. We shook the moulds to settle the chocolate, and back into the fridge.

After the test chocolates set, we put half in the fridge, and left the rest on the counter, to see how they held up at room temperature. After a week the chilled ones were fine, the others has degraded a bit, so that was good to know.

What about dying the fillings? Peppermint patties are white anyway, but how can you make pink, orange, and yellow, without using food colouring? We added a dash of pure beet juice to the raspberry which worked like a charm, soft pink was achieved. (Experiments with other vegetable juices to colour the orange and butter cream failed.)

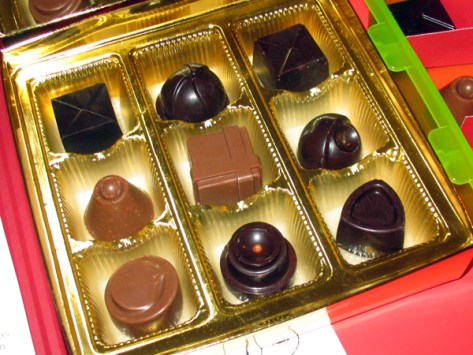
Six, it was time to make the first batch of real chocolates. Armed with what we learned from the test trial, we made a batch of chocolates for Boyfriend’s family. Everything turned out wonderfully, aside from the Toblerone ganache which collapsed.  However, it was the tastiest one.

After spending the weekend with his family, we came home and went to work on round 2 for my family – which would be shipped on the VIA train. Back to the drawing board on the Toblerones, and decided to skip the ganache this time, and just melt and mould solid Tolberone, which held up much better.

The brown triangle in the top left corner is the label, which I have blurred out, but it says the name of our chocolate company, so to speak.

Verdict:

Collaborating with Boyfriend was a lot of fun. Aside from the tears and the tantrum at the train station (which is a long boring story), I had a great time! His family really enjoyed the chocolates, and hopefully my family likes them too. ^^

The lovely ribbon I was so excited about? Completely forgot to use it until today. The map was a little bit off. We had planned to use the tiered square for 3 flavours, but ended up with 4 in that shape, and the milk chocolate ganache and the dulce de leche were reversed. Oops.

I think my idea for Toblerone ganache is still a sound premise, but I’m going to have to keep tinkering. Placing the ganache fillings into the chocolate was really tricky, the fillings oozed out a bit, I’m not sure if adding more liquid to the ganache would help or not.

For next year, I’ll make sure I have at least 2 copies of each mould so we can make 30 per flavour at a time. I’ll also start a few days earlier, got a bit distracted and left some things to the last minute.

Where to get supplies:

Both online orders arrived promptly, and had been packed with care. I’ll order from both companies again.

Patty’s peppermint bark

I’ve been making peppermint bark for a few years. It’s my Christmas specialty. I’ve experimented with different brands of chocolate, candy canes, and peppermint extract vs. peppermint oil, and when I make my annual trip to buy mass quantities of Belgian chocolate, inevitably the shop keeper and other patrons ask me what I’m making. This sparks interesting discussions in the line-up about the best way to achieve a perfect bark, like so:

I send it to my family and Boyfriend’s family. This year, I wanted to make bark, plus a surprise that Boyfriend and I collaborated on. The surprise will not be unveiled for a few days, but I’ll teach you how to make bark today.

One popular bark flavour is using all-white chocolate with red canes, but I prefer a bark that is 2 parts white chocolate to 1 part semi-sweet, using the traditional red, green, and white candy canes per batch.

Good to know before you start:

The chocolate must be tempered, so review my how-to guide before trying this.

Buying candy canes after Christmas is an exercise in futility, lots of places sell out. I buy the canes in Nov, and pick up the Callebaut chocolate in Dec. Whether or not to use peppermint extract or peppermint oil depends on your taste preference, I prefer the oil which I order online from Golda’s Kitchen.

Working with chocolate, you must make sure EVERY dish and implement is completely dry. A drop of water will cause the chocolate to seize.

Wear latex gloves while handling chocolate to prevent the natural oils in your skin from blemishing it. The heat of your hands will also melt it, wearing gloves helps reduce the heat a bit.

this is a lot of chocolate

(By the way, that picture is all the chocolate I purchased this year, not just the portion I used for my bark. I just like looking at all of it together.)

Time required: 5 hours

Yields: enough for 7 households

Total cost: depends on the quality of chocolate, and since it’s a gift I’m not going to say

Special kitchen implements I used:

  • chocolate thermometer
  • 2 cookie trays: 18″ x 12″ and 14″ x 10″
  • wax paper
  • hammer
  • large freezer bag
  • gloves/tongs

Ingredients:

  • 8 oz semi-sweet chocolate
  • 16 oz white chocolate
  • a few drops of peppermint oil (I use LorAnn oils)
  • 6 jumbo Allan peppermint candy canes

Instructions:

1. Line baking trays with wax paper.

2. Use a serrated blade to chop the semi-sweet chocolate. Weigh out 8 oz, and divide it between two bowls: two thirds in one, one third in the other. Temper the chocolate and stir in one drop of peppermint oil.

3. Pour the chocolate into the trays, spreading evenly with a spatula. Chill in fridge for at least 10 minutes.

Take a break to wash and dry your bowls and chocolate thermometer, they must be bone dry.

4. Unwrap the candy canes, place into freezer bag, and HULK SMASH!! Hammer away until you’ve got a bag of itty-bitty pieces, and set them aside.

5. Chop the white chocolate, and temper it too! Stir in 2-3 drops of peppermint oil.

6. Stir crushed canes into white chocolate.

7. Immediately pour onto first layer and spread evenly with spatula.

Let the trays sit on the counter for 15 min, this gives the white chocolate time to bond to the semi-sweet. Once I forgot to do that, and the white never really adhered to the bottom layer. :[

8. Chill in fridge for at least 3 hours.

9. When you are ready to cut it into pieces, remove the wax paper from the bottom and let it sit on the cutting board for 10 minutes. Use a heavy blade to cut into strips.

10.  Place into tins, separate each layer with a piece of waxed paper.

11. Keep in the fridge. Allow the pieces to sit at room temp for 10 minutes before eating.

12. See all that bark dust on the cutting board? Save it as a garnish for hot chocolate with steamed milk, or pancakes!!

Verdict: When I started out making bark, I used to make it with equal parts of each chocolate. My sister Chocoholic suggested decreasing the semi-sweet. I followed her advice and was really pleased with the result. Bark has a strong flavour so a thin piece is fine, using the 2:1 ratio results in perfect, delicious bark. Merry Christmas!

Playlist: Type O Negative – Hey Pete

On chocolate making

I had an wonderful thought on making chocolates the last time I was at the grocery store.

“Look,” I said to Boyfriend, “they are selling giant Toblerone bars for $8.00 over there!”

“Nevermind that!” he said, and valiantly tried to steer me away.

“Think about it: Toblerone ganache.”

“What’s that?”

“You make ganache by pouring scalded cream onto chopped chocolate, then let it set.  I want to buy that bar and make a Toblerone ganache, and use it as a filling for a new chocolate I’m going to make!!”

“Hmmm…”

That was the critical moment. I knew I had won.

But alas, no chocolatiering for me today, I am very sick and it’s going to be a few days before I am fit for baking. However, December is here which means: very soon I will soon be making my Christmas specialty. While I am recuperating, I’m interesting in hearing your thoughts on chocolate.


Chocolate truffles

Yesterday Hobby Victim invited me and Boyfriend over for a day of food, video games, and chocolate making. She had a godly supply of fine chocolate, truffle shells, and liquor. I arrived with a bag of equipment and flavouring oils. We quickly got started:

You can make truffles by rolling them by hand – which is difficult –  or by using truffle shells.  A truffle shell is a hollow chocolate sphere, with a hole in the top, which you can pipe a filling into.  It yields a more even and professional look.

Each truffle consists of a filling of rich dark chocolate ganache, a shell of white or dark chocolate, a coating of milk chocolate, and a lovely garnish. We made 4 flavours:

  • Triple Sec and orange cream
  • Baileys Irish cream
  • Peppermint
  • Crème de Cassis (black currant) and raspberry

To prepare the ganache for the fillings, Hobby Victim scalded the cream while I chopped the chocolate. She tempered the hot cream into the chocolate and whisked it up.

We divided the ganache into 4 bowls, and added the liquor and essential oils to taste.

An essential oil is a pure concentrated oil, whereas flavour extracts are a mixture of oil and alcohol. The oils are about 4 times stronger than extracts, yielding a much more intense flavour. You can find these oils in specialty shops or online.

The fillings were cooled in the fridge for awhile, then transferred into piping bags, and the ganache was squirted into the open hole in the top of the shells.  Back into the fridge for awhile to set.

We made second batch of ganache to use as a final coating.  Each truffle was dipped in the bowl and transferred to a cookie sheet, where various decorations were added while the coating was still soft, so when it hardened it would look like so:

peppermint truffles with candy canes

Aren’t they lovely? They remind me of little ornaments.

truffles with sprinkles, white chocolate, and sugar

I’m pleased to report they all tasted delicious.

truffles, truffles every where!

These took awhile to make, but I had a great time. Baileys shots makes any lengthy task worth doing. I will definitely make these again, and when I do, I’ll post some how-to pictures for you.

What type of chocolates do you want to see next?

Patty’s chocolates round 1 – peppermint

I have made chocolates before, but I have never used a chocolate mould before. I was curious if having a properly shaped and sized chocolate would really make a difference. Taste is the most important factor, and I know that my chocolates taste good. So how important are aesthetics? Let’s find out.

Once again I am using Callebaut chocolate which I adore.

(Belgian chocolate + peppermint) x joy² ÷ 15 = bliss

Good to know before you start:

Make sure that all your kitchen implements are clean and dry to prevent seizing.

Time required: 3.5 hr (30 min prep plus chilling)

Yields: 15 pieces

Cost per portion: $1.00

Total cost if you have none of the ingredients: $15.00

Special kitchen implements I used:

  • fine sieve
  • Fat Daddio’s silicone chocolate mould, sloped cylinder shape
  • Wilton silicone spatula, with flat end

Ingredients:

  • 4 oz semi-sweet Belgian chocolate
  • 1 oz semi-sweet mint chocolate Chipits
  • ⅛ C heavy cream
  • 3-4 drops peppermint oil

Instructions:

1. Melt chocolate in the microwave, reserving about one third. Microwave on High for 3 minutes, stirring every 30 seconds.

2. Add reserved chocolate to melted chocolate, and stir in 1 drop peppermint oil. Stir until smooth.

3. In a heavy-bottom sauce pan add cream and 2 drops of peppermint oil, heat to scalding.

4. Using a sieve, add cream to chocolate and stir until smooth.

5. Spoon into mould. My chocolate was very thick so “smoosh into mould” might be more accurate.

6. Run a flat-end scraper over the top of the mould. I used my silicone spatula for this, in 3 passes. This action collects the excess chocolate on the end of the scraper, which you can then stuff into any cup that isn’t filled enough.

7. Place mould into covered container, and chill. The product description says chill 20 min but I let them chill for 3 hours before sampling, and the were perfect, and I left the rest in the fridge overnight anyway.

8. To remove from mould, cover your hand with a plastic baggy and use thumb to pop out the chocolates. The plastic prevents the oils on your skin from blemishing the chocolates. Work quickly and touch the pieces as little as possible to avoid melting and smudges.

Verdict: These turned out great, I’m quite pleased. They are smooth, creamy, and make my taste buds sing. Oh, I love peppermint!

Using a chocolate mould was easy. If you want to make a large amount of chocolates, use 4 moulds at a time and quadruple the amounts of chocolate. This mould cost $8.25 and was totally worth it.

I knew my chocolate would have air bubbles because it was so thick, there was no way to ensure it flowed into the moulds evenly. If you are looking for a perfectly smooth finished product, skip the cream.

I don’t regret any of the chocolates I made in muffin tin cups, but from now on I will always use a mould.

Making these has changed me profoundly. I’m completely serious. It feels like I have reached a whole new level in baking. I feel like a rock star. It reminds me of the day I made the dessert that changed my life, but more on that in December.

Have you ever baked something that made you feel differently about your mad skills?

Playlist: Castlevania soundtrack